Here in this post, we will discuss the process of adding a CCTV Camera to a Hikvision NVR. To understand this procedure you need to have a Hikvision NVR, a Network Camera, a Monitor, and a network cable.
Before going for the device addition you have to connect all these devices and then open the NVR on the Monitor.
How to Add a Camera in Hikvision NVR? The answer to this question is detailed step-by-step here. The images and narrations guide you crisply and comprehensively.
The device addition, deletion, recording, backup, and playback are all important features of the NVR.
How to Add a Camera in Hikvision NVR- Step-by-Step Guide
To add a CCTV Camera preferably a Hikvision Network Camera with a Hkvision NVR is illustrated here. The complete procedure of the process is displayed.
Users will find it extremely useful.
Let’s begin the step-by-step guidance here.
Step 1- Connect the System
The first thing is that users have ti connect their systems accordingly and switch on the Hikvision NVR.
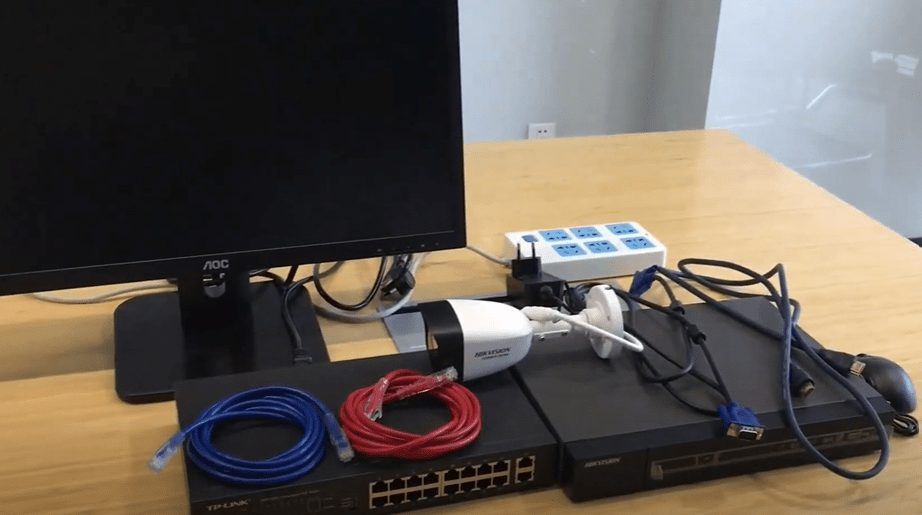
If you are using a PoE camera, use a PoE Switch or else use a power adapter to give power.
After connecting all the things, we get the following settings page.
Step 2- Create a Network Camera Password
This is the first page on the monitor after connecting the camera to the Hikvision NVR.
It is asking us to create a password and mention the enter the camera activation IP address.
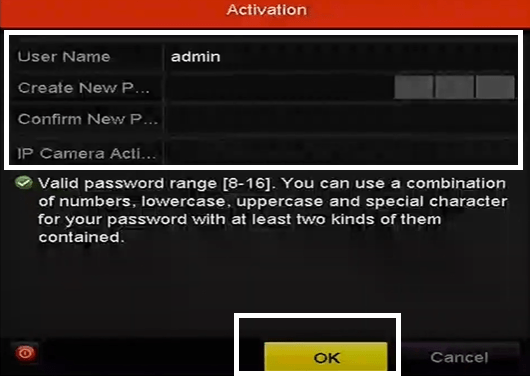
Create a password, mention the IP address of the device and then press the ok button.
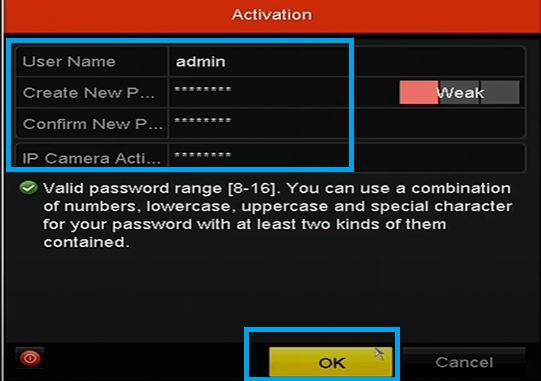
Always create a strong password.

After mentioning the Device IP address and the password, we get this page on the screen.
It shows that the device is activated to show up.
Don’t go to reset the password option. Press the no button and you get the following page.
Step 3- Unlock or Sign the NVR
Here, unlock the pattern to get the menu folder of the device.
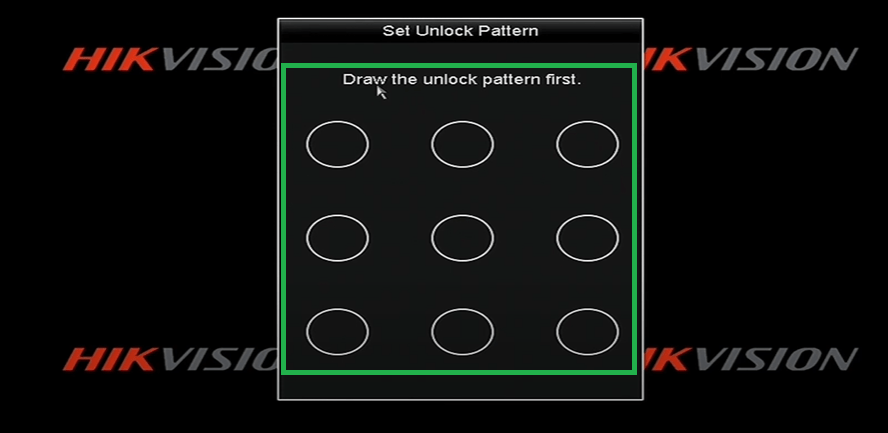
To sign in to the device, we have to unlock the pattern.
Make the pattern and you get the next page.
Step 4- Select the Language of the NVR
Select the language of the Hikvision NVR.

By default it is English. You can choose any other language as well. Press Apply and you come to the next step.
Step 5- Go to the Main Menu
By right-clicking on the mouse, we get this page.
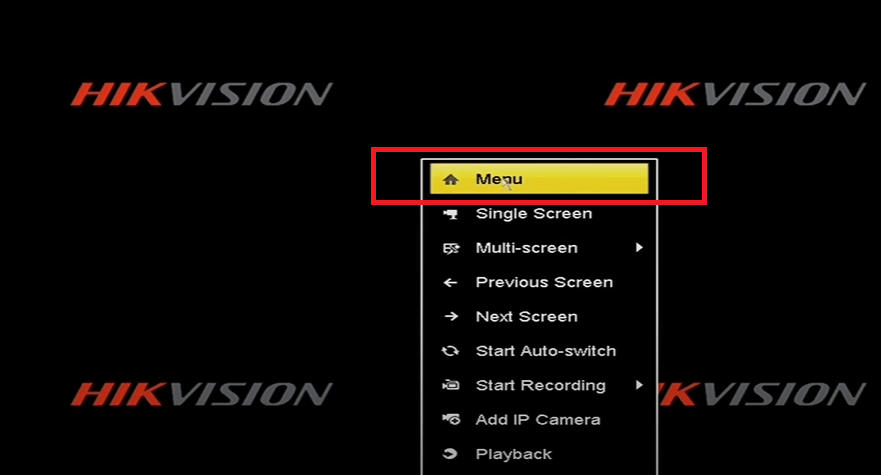
We reach the menu page of the folder. Press the menu option.
Step 6- Go to the Configuration Option
We get the following page.
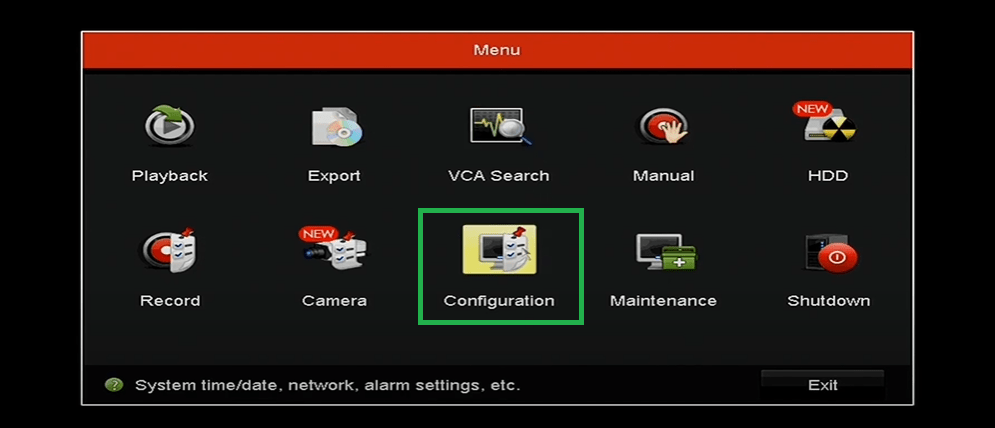
Click the configuration option given on the screen.
Step 7- Go to the Network Option
When we press it, we get to the next page. Here go for the network option.
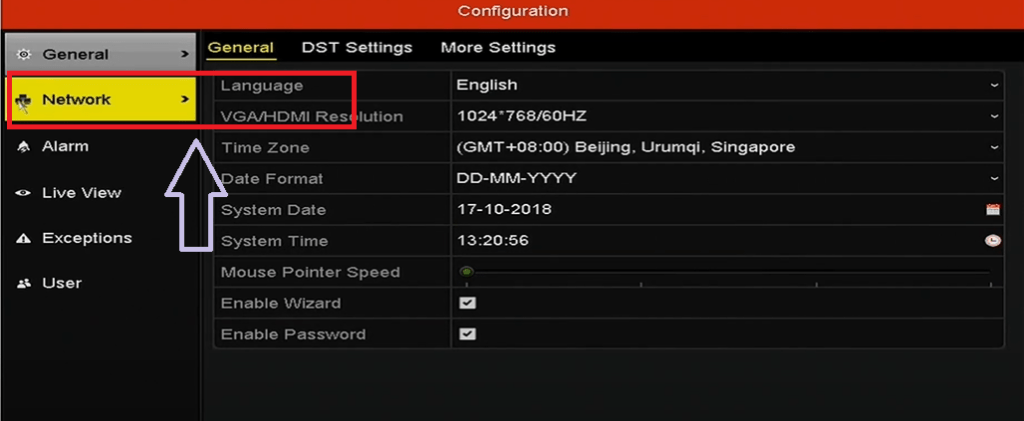
This page opens on the screen.
Step 8- Modify the IP of the Device
Here, we are required to modify the IP address.
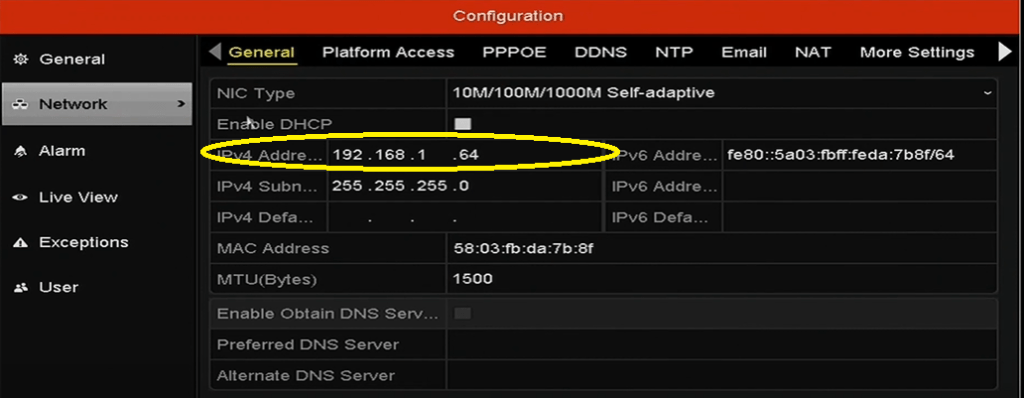
Mention the IP address in alignment with the IPv4 address.
Press the ok button.
Step 9- Go to the Camera Settings in Menu Option
We get the following page.
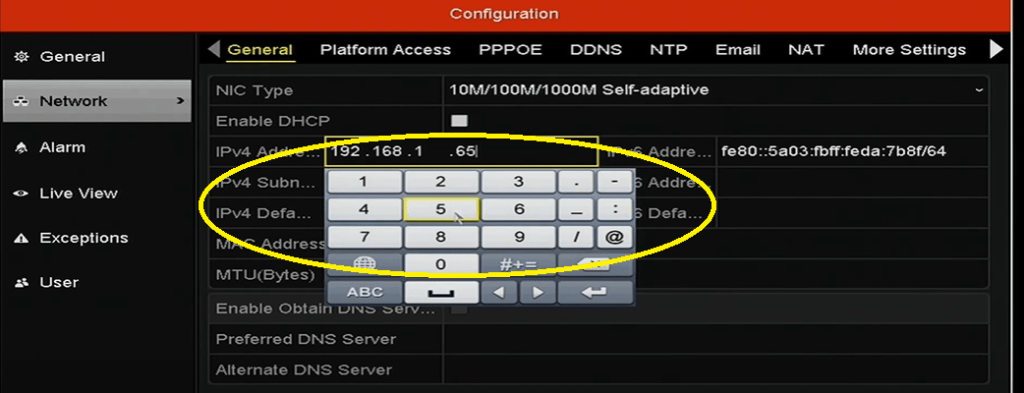
Mention the IP address and alignment and then go to the next page.
Step 10- Add the Device by Clicking on the Camera Option
Go to the menu page and press the camera option.
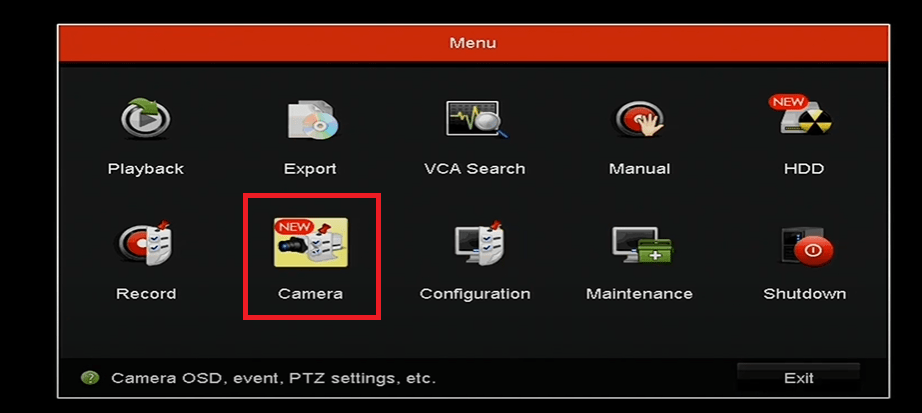
When you open the camera option, you get this page.
Step 11- Camera is Added, Watch the Preview
We have to activate the camera to add it to the Hikvision NVR.
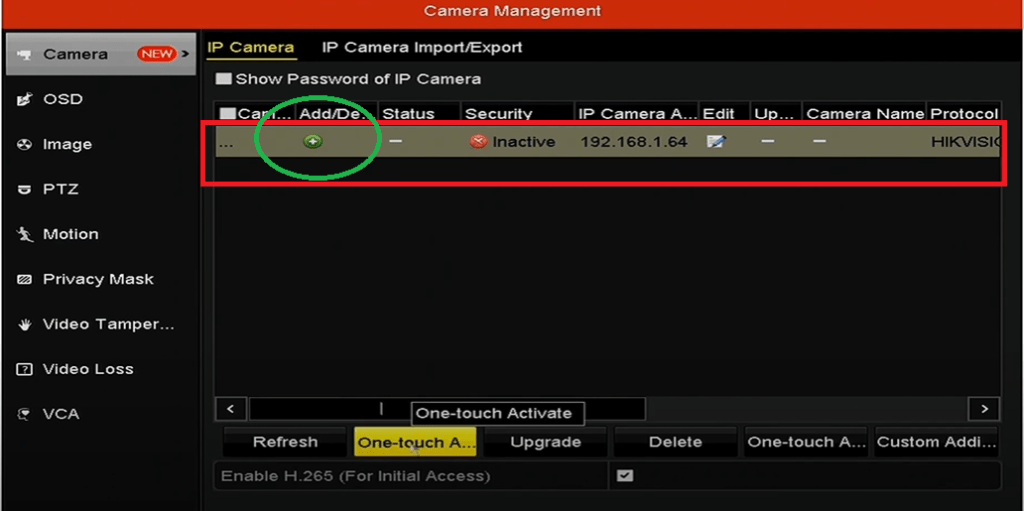
Press the “One touch activate” tab.
You get the following option on the screen.
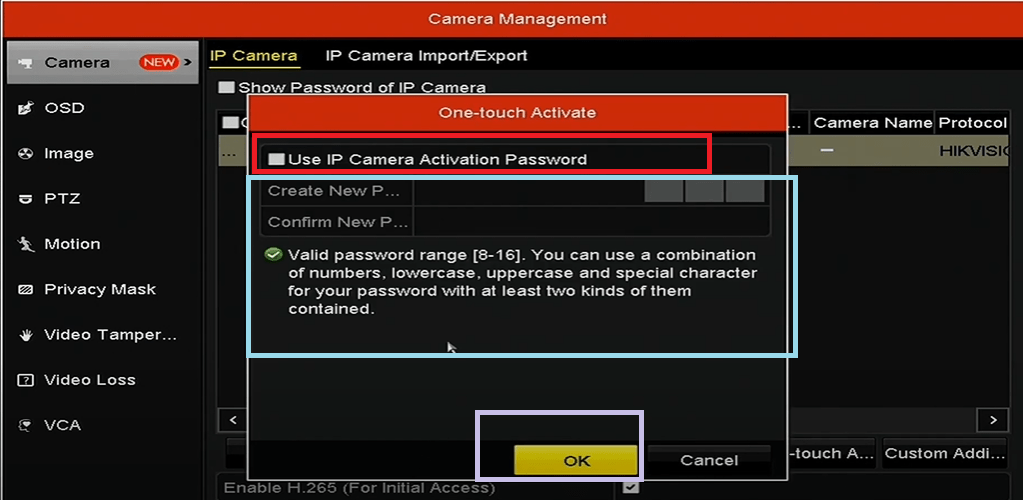
Here, you have two options.
Either you go with the device password or you create a new password and then click the OK button.
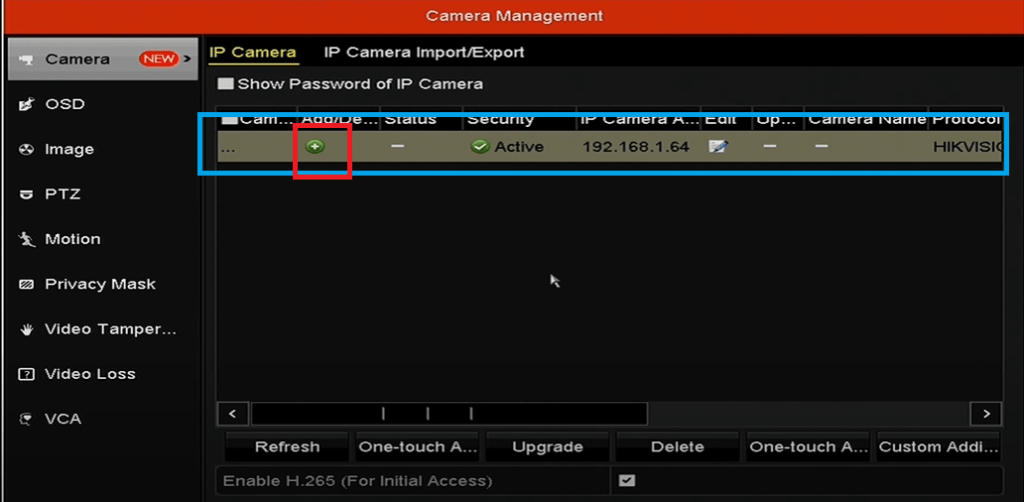
The device gets activated. It means you can watch the camera on the screen., It is added with the NVR.
Press the preview button and the device appears on the screen.
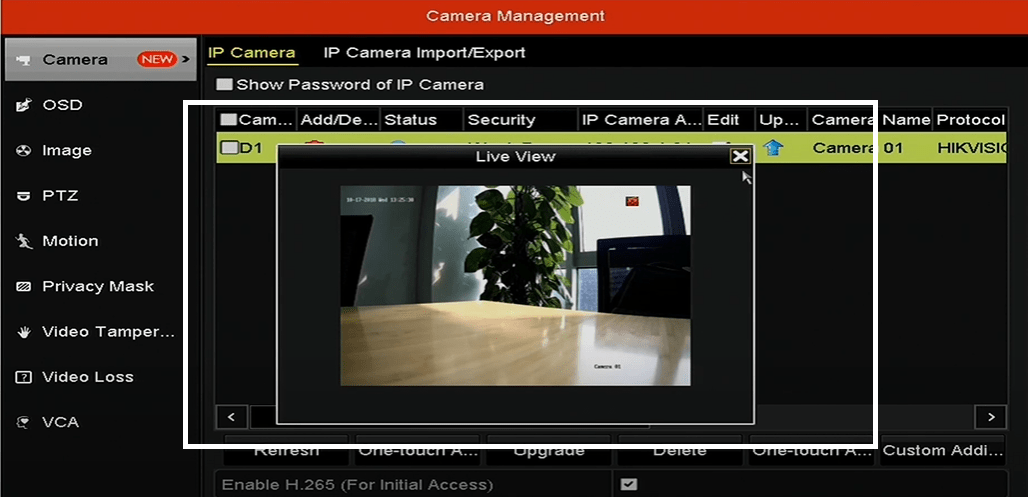
This way, you add the device and get the camera on the monitor screen.
Step 12- Watch the Added Camera Live on a Hikvision NVR
The added device can be monitored now.
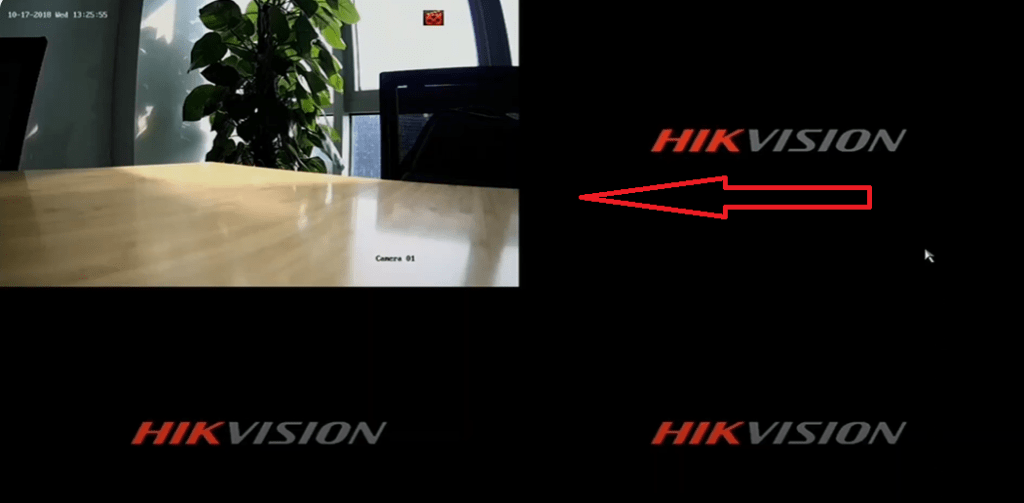
This way you will add the Network Camera with the Hikvision NVR. Enjoy the watching.
Conclusion
The full demonstration of adding a camera in Hikvision NVR is provided here. The users must have received stepwise guidance from the article.
The images and narrations support the procedure. Users can easily comprehend.
Please ask your queries and give suggestions in the comment section. Your opinions are valuable to us. We respond to every query and comment.
Thank You.
How do I connect a CCTV camera to a Hikvision NVR?
Connect the camera to the NVR using an Ethernet cable if it’s a PoE camera. Non-PoE cameras require a separate power source. After that, you have to go to the network option and give the IP address of the camera. Then go to the Camera option in the NVR settings and add the device by following the prompts.
Can I add non-Hikvision cameras to a Hikvision NVR?
Yes, but the camera must support the ONVIF protocol or be manually configured via RTSP.
Do I need a separate power source for the cameras?
If your NVR is capable of PoE (Power over Ethernet), the Ethernet cable will power the camera. Otherwise, you need a separate power source for non-PoE cameras.
How do I enable the ONVIF protocol for third-party cameras?
Go to the camera’s web interface, find the network settings, and enable ONVIF.
What is the maximum number of cameras I can add to a Hikvision NVR?
This depends on the NVR model. Typically, NVRs range from 4 to 64 channels.
Why can’t I see the camera feed after connecting?
Ensure the camera is powered and the Ethernet cable is working properly. Check if the camera’s IP address is compatible with the NVR’s network settings.
How do I assign an IP address to a camera?
Use the Hikvision SADP tool to scan and modify the IP address to match the NVR’s subnet.
Can I use wireless cameras with Hikvision NVR?
Yes, if the camera supports Wi-Fi. You must connect the camera to the same network as the NVR.
What should I do if the camera shows “Offline” on the NVR?
Check the IP address, network connection, and power supply, and ensure the camera is properly activated.