We will describe in this article how to take Hikvision NVR Backup To USB. A similar process will also be applied to take the Hikvision DVR Backup To USB. This post will thoroughly guide you to retrieve data in a pen drive. Whenever we introduce a security surveillance system at any place, our purpose is to monitor the location.
Monitoring and supervision are close friends. When we monitor, then we supervise. During it, we feel and face many activities that require our second attention and thought. Similarly, some incidents creep in which requires our more focused approach.
We need to take the backup available to closely watch the incident. We do it to reach a better conclusion and improve upon the situation.
Take The Hikvision NVR/DVR Backup To USB
To take the backup in a USB, we have to understand how an NVR behaves. What are the steps to retrieve the data in a pen drive? Here, you will all this information. We have given them to them in an illustrative form. It will easily guide you to get the required clip in any USB drive.
You may get as many clips as possible in a drive. Just you have to know the length of the clips and the capacity of your external storage device. The length of the clips is in MBs. The length depends on the duration of the recording and its quality. A long-duration clip may extend its length to GBs.
Step-1 External Drive Insertion
In this first point, we will take a pen drive or any other USB drive. We insert it in an NVR. There are slots available for USB drives in an NVR or DVR. These slots are on the front side and the backside of the recorder. Mainly every recorder has at least two to three USB slots. One on the front side of it and one or two on the backside.
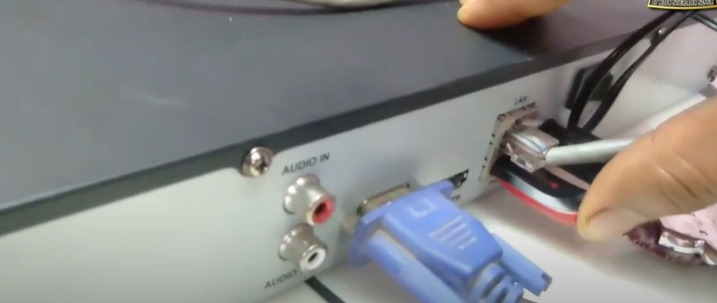
The point which we need to remember as a thumb rule is that we will always insert a USB drive on the backside slots and never on the front side slot. We will use the front side slot for the ‘mouse’ connection. After inserting the pen drive we will move to the next point.
Step-2 Go To The Quick Menu
Here, we will open the quick menu of the recorder. For that, we have to go to the home screen and then Right Click the mouse. When we do it, the following page opens.
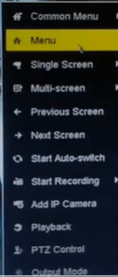
Here you will find many functions, to move ahead, you have to click the ‘Menu’ column. We will go to the next point.
When we click and try to go to the main menu, due to security reasons, the system asks us to log in to the app. It is because only an authorized person has access to these sensitive things.
Step-3 Login to The App For Authorization
For it, this page opens.
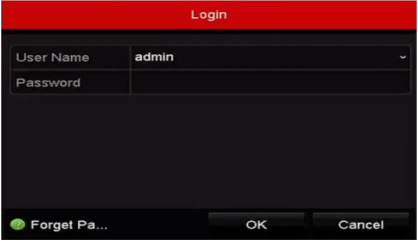
Put the username and the password and then press the OK button to log in. This way the Hikvision system gives us access to the main menu.
Step-4 Open The Main Menu
When we successfully log in, this page opens for us.
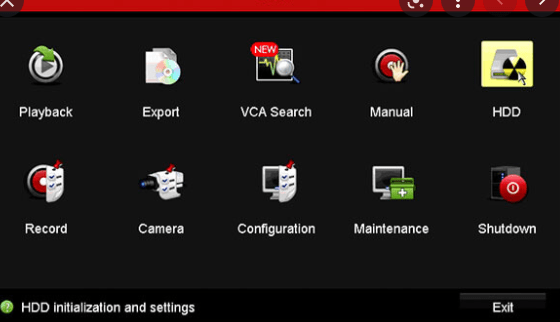
It is the main menu. We have to take the backup of the data. For that among all these options given here, we will choose the “Export” option.
Step-5 Export Option Is For Backup File
We select the export option here. This option gives us the management of the camera to which we are trying to retrieve the recording on our drive. After the selection of this Export option, it asks us to select a few more options.
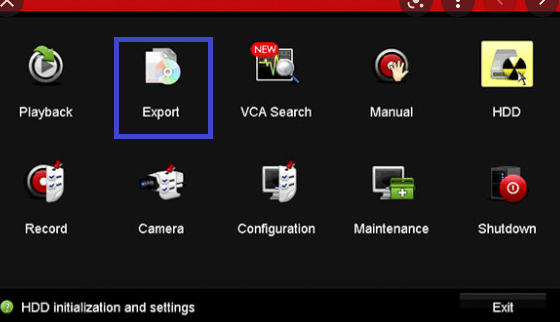
We have shown here in this diagram the selected option. We export the data. and reach the next window.
There we will select the camera or cameras to which we have to take the recording. For that you have to tick the box of the camera, you are seeking for the recording.
You can select as many clips at a time as you want. But for smoother operation select two to three clips at a time. Selection of the clips is possible under a certain timeline. So you have also to give the time slab, date, and the camera.
The system will guide you to these options. Select the camera first, then the duration for which you are looking for the recording. Select them as shown in the next stage and image.
Step- 6 Select The camera, Date & The Clip Duration
Tick in the box of the camera. The recording will appear in the timeline. Check it and mark the time frame for which you want to export the data.
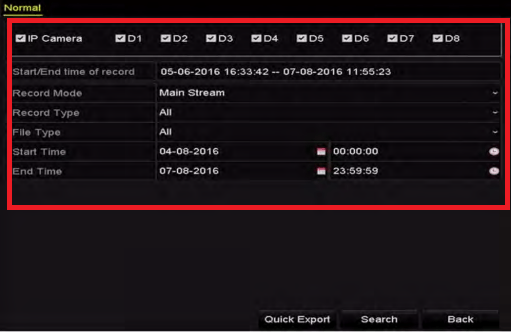
As mentioned here, you can see it. After mentioning these things, press the search option.
Step 7 The Chart/List Of The Backup Files
Here we see a list. It is regarding our chosen files. The list shows that these are the files you have chosen for backups. If you have any doubt, you can run these files again to confirm your selection.
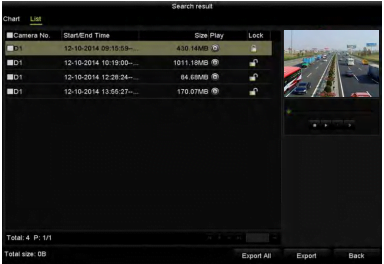
If you want to change any file or time frame, you can do that by pressing the back button. If you don’t want to make any changes, then press the quick export button. If you want to add more files or edit them, go for the search option.
The stage is well set to backup the file. The Hikvision NVR/DVR has a quality function that can show you simultaneously the running clip which you have selected. If fully satisfied, press the Export All option.
Step-8 The Export Location & The File Size
The window will tell you about the location or the USB folder where you are exporting these files. It will also mention the length of the clips. The lengthier the clip, the more data it captures. If there is nothing to change, press the Export button.
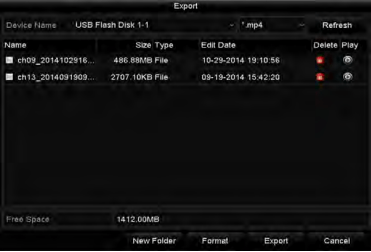
Here, you will find another option for the new folder. This new folder is given to get the backup in a new folder. Suppose your drive has already some files in it. If you record these files in the same folder, it may be a little hodge-podge. Rename your folder for identification.
Step-9 Exporting Of The File Begins
Here, the folder is exporting the file. It takes some time to export every content to the chosen drive.
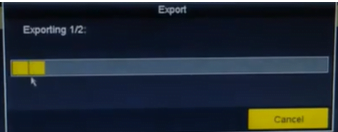
For example, we are showing you here the loading of two files. They are exported one by one. With it, we reach the last leg of our taking the backup file process. When it finishes with the export, we get a notification. The notification is the indication that we are done with the backup.
Step-10 The Backup Is Finished
It opens the following window. It indicates that we have satisfactorily completed the process.
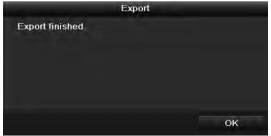
This way we achieve the target. This way we take the Hikvision NVR Backup To USB. By following a similar method we can do it for the Hikvision DVR Backup To USB.
The NVR also gives you the option to export files in MP4 or any other media file. It depends on you to select the media file that suits your system. For example, you can take a glimpse here. It will make the case more prominent.
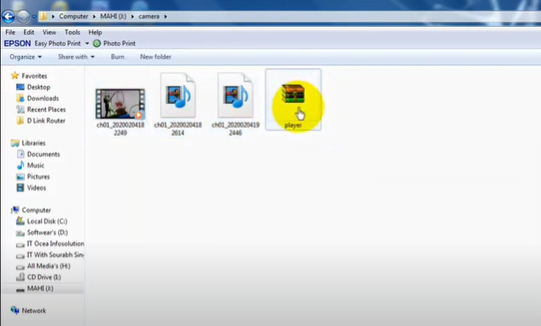
This way we learn every step of this Backup Process. We have given it here in 10 points. Go through every point once again for a better insight.
Conclusion
In this article, we have dealt with the narration of the HIkvision NVR/DVR Backup to the USB. We have guided you here at length with figures. There are 10 steps in it. Every stage is explained and demonstrated with a bold image. It shows you the step-by-step process. you can easily do it yourself.
It is simple and rules-oriented. If you follow these stages as mentioned here, you will not feel any issue doing it yourself.
If you find any problem with any level, please let us know. We would love to tackle queries and resolve them. If you want any processes in detail, please raise the issue with us. We are always ready to serve you.
Thank You.
