Here we are offering to download the iCSee Application. The iCSee App is a security surveillance Software. It connects CCTV Devices and gives them remote access to PCs and Smartphones. This application is compatible with Windows 7/8/10/11 versions.
If you have an iCSee CCTV camera and want to connect it to your Windows-based computer, then iCSee for PC CMS software is available.
iCSee is a Chinese company and it manufactures good stand-alone CCTV cameras and wifi enabled CCTV cameras. So here you can free download the iCsee CMS also here you can see a demonstration of how to use iCSee on your computer.
iCSee CMS Application Compatible With Windows 7/8/10/11 or MAC
Sometimes we have configured our CCTV camera system on our mobile device but are unable to get our cameras on our PC. So then here is software available for the Windows operating system so you can easily install the setup on your PC and get your CCTV camera on your computer with the help of iCSee Software.
What is the iCSee App?
The iCsee is software to run your CCTV cameras on your computer. It is manufactured by the iCSee. This is the software by which you can view your CCTV cameras with the help of the internet.
You can also manage your CCTV system with the help of iCSee for PC. To connect your iCSee system on your Windows computer, first download the setup file of the software and then follow the given steps then you will be able to connect your CCTV cameras on your PC.
Features of the iCSee App
- Able to view your CCTV cameras on your PC.
- Watch the recording of CCTV.
- Add multiple devices to the software.
- Set the live view as per your needs.
- Set the number of cameras on the screen.
- Multilanguage supports.
- Manage software users.
- Motion search.
- Log monitor.
Get iCSEE CMS App (Windows)
Here is the link available for the download of iCSee CMS. You can download the setup file by clicking the link below. The downloaded setup file will be in the compressed format.
Before using the setup file of iCsee for Windows, you need to extract the file. You may use the Winrar to unzip the setup file. So before going further, download the setup file at the link below.
How to Install iCSee on Windows and MAC Computer
Here we are going to discuss the two methods for having your iCSee CCTV camera on your PC. In the first method, we are going to use software specially designed for Windows computers.
In the second method, we will use an emulator to have your iCSee cameras on your computer either the MAC PC or it is Windows PC.
Method 1 # Using the iCSee App without Bluestack
In this method, we are going to use the software which is designed for iCSee CCTV cameras. For this method, you have to download the setup file from the link above uncompress the setup file and save it on your PC. Now follow the simple steps given below.
STEP 1 #Installation of iCSee
Firstly, go to the folder in which the downloaded file is saved. Right-click on the setup file and you will get an option called “Run as administrator“.
Click on this option and the system will ask permission for the installation of iCSee Software Just click on the “Yes” button and now your setup is about to install on your computer.
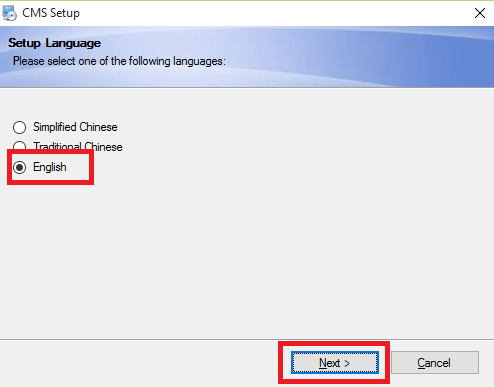
Now you have to select the setup language for your App. In my case, I have selected the English language. Then press the “Next” button.
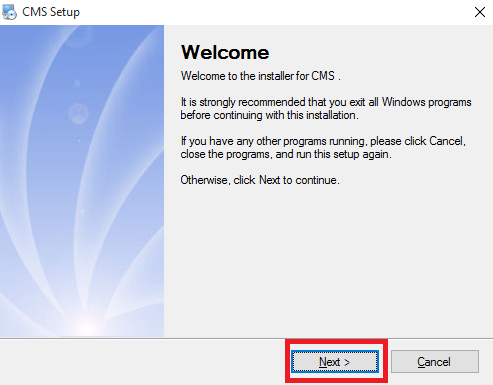
After that, you can get a welcome screen for the installation of the iCSee setup. In this window, you just need to press the “Next” button.
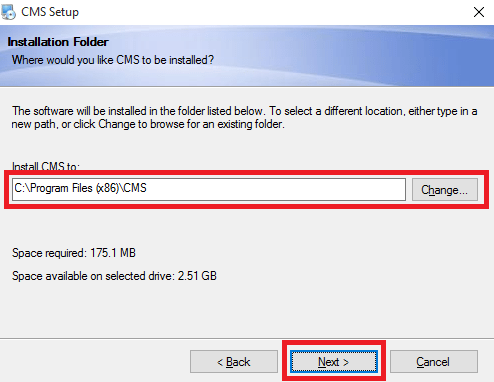
In this screen, you have to select the installation directory where the software will install. You can change the directory according to your need or you may also leave it as it is. After that, press the “Next” button.
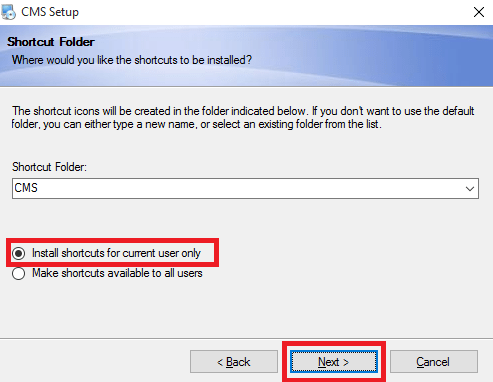
In this screen of the software installation, you need to select the shortcut folder where a shortcut will appear for running your software. Also, select that you want to create a shortcut for all users of your computer or only for the current users.
You can select these as per choice and then click the “Next” button.
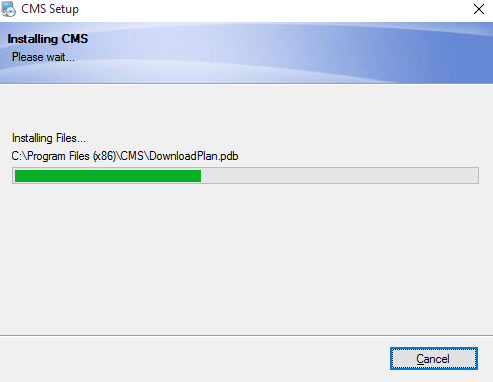
Now, wait for some time until the software will install on your PC
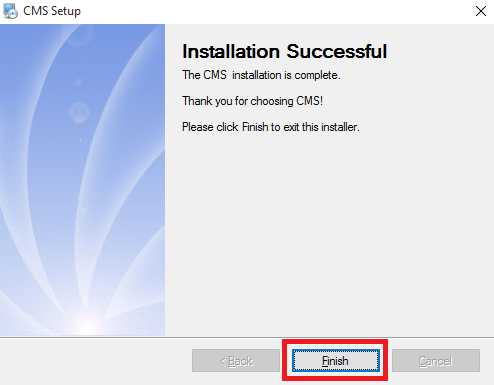
After the successful installation of iCSee, you will get a screen as shown above. Click on the Finish button.
STEP 2 # Login to iCSee
After completing the setup of the software, you will get a screen as shown below. Be careful this time because if you chose the wrong language then all options of the software are shown in that language and to correct this you need to reinstall the complete setup.
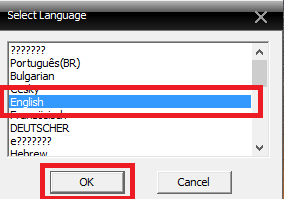
Choose the right language which is suitable for you and then click the “OK” button.
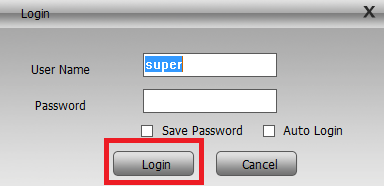
Then the new screen appears to you as shown in the above picture. keep the username super and leave the password blank. You can change the username and the password as per your desire after login to iCsee. Click on the “Login” button.
STEP 3 # Add your cameras to the CMS App
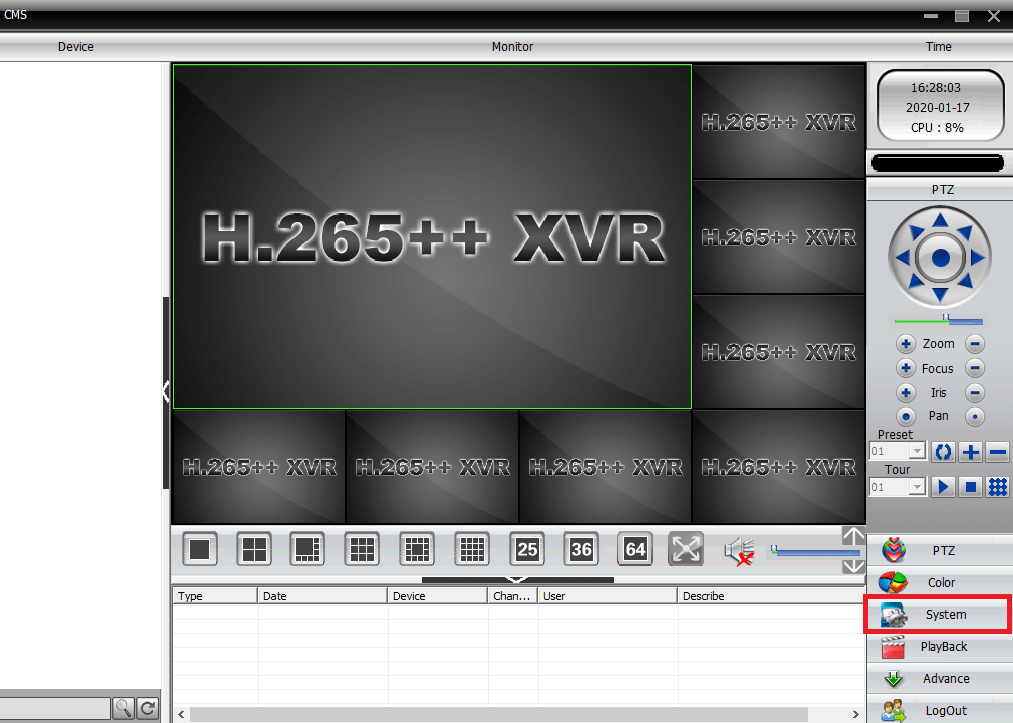
In this step, we are going to demonstrate how can you connect your CCTV cameras to the software. After login to the software, you can see a screen as shown in the picture below. On this screen, you can find the option “System” in the right-below corner. Click on that icon.
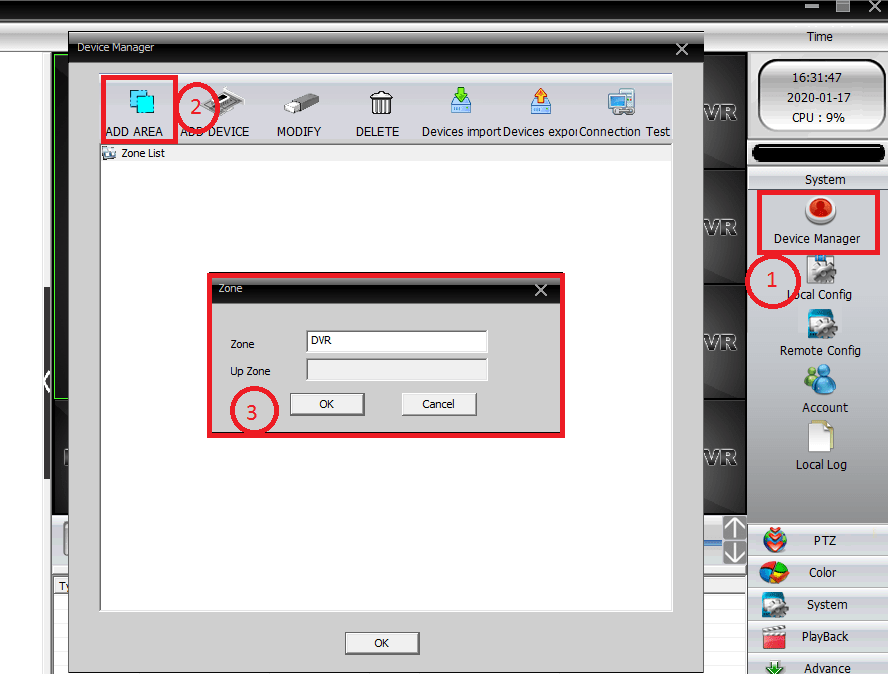
Then at your right side span, you can find the Device Manage option as shown in the picture below. Click on that icon and then a new popup window will appear to you called “Device Manager“.
In this window click on the “ADD AREA” and then again a new window will open named “Zone”. Fill a zone name as you want into that window and click “OK”. In my case, I created a zone called “DVR”.
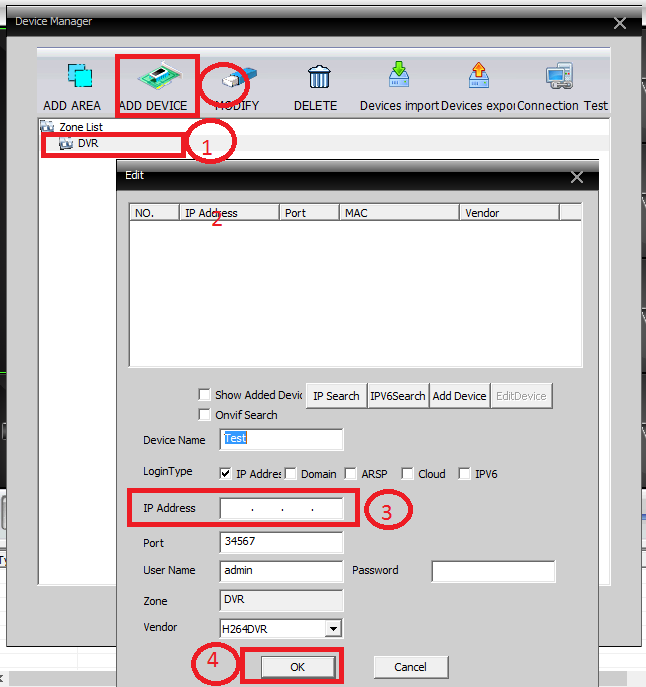
Now select the zone name and click on “ADD DEVICE“. In the next window, you have filled all the information like the IP address, the port number, username and the password of your device.
You may also choose another login type such as the domain, ARSP or cloud. In my case, I choose the IP address.
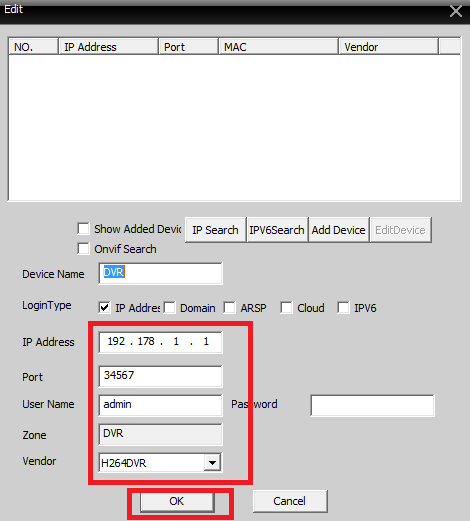
After filling in all the correct information click on the “OK” button. Now you have successfully added your CCTV device.
STEP 4 # See the live view
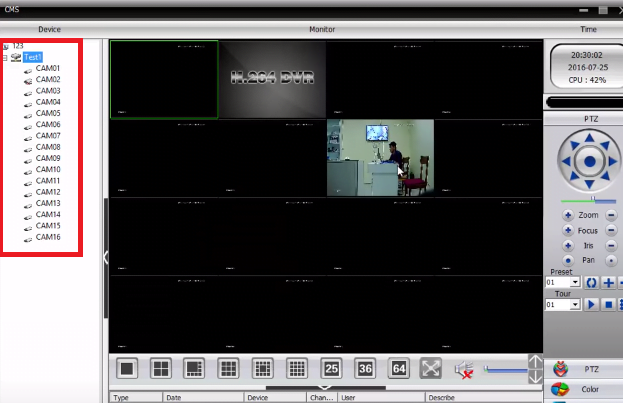
To watch the live view of the camera on your App, close all the windows and jump to the main screen of the software. Here on the left upper corner, you can see your zone name.
Double-click on the zone name and all camera name lists will appear to you. Double-click on the camera name and now you can your camera on your PC by using the iCSee CMS.
Method 2 # Using the Emulator
In this method, we are using an emulator by which you can run your exact mobile application on your PC and watch your CCTV cameras on your PC.
Emulator a program that allows run the mobile operating system on your computer operating system.
By using this emulator you can see all your cameras on your computer as same as on your mobile phone. To do so you just need to follow some basic steps as given below and then you can see your ICsee app.
- You have Download the Blustacks from its Website.
- Now find the shortcut for the Bluestacks on your desktop and double click on that icon now the emulator is running on your MAC or Windows PC.
- Now, go to the “My App” option on the Blustacks.
- The next window asks you the sign in or join.
- Sign in with your current email account.
- After signing into the My app, search for the ICsee.
- Install the iCsee application on your emulator.
- Run the ICsee Software on the emulator.
- Now add your CCTV cameras on the iCSee application.
- After completing all the steps, now you can watch your CCTV cameras on your PC.
Conclusion
The iCSee is a generally excellent program to watch your CCTV camera on your PC. It is very easy to understand and quick handling of the software.
The best thing is you can utilize it with any adaptation of Windows 7/8/10 and works for all IOS forms too.
Here we talked about two techniques for iCSee for Windows. Both the techniques are trusted and solid yet we prescribed the primary strategy since it is a customized program for the PC clients and it has greater usefulness.
In the subsequent strategy, we utilized outsider programming so it is working fine yet not for the propelled clients.
Thus, this is about this App. We trust this data will be supportive of you. On the off chance that you have to pose any inquiries about these techniques please keep in touch with us in the remark box.
You can likewise compose proposals and we will exceptionally welcome this. Much obliged to you for visiting us. Have a decent day.
Is iCSee available for both Android and iOS?
Yes, iCSee is available for download on both the Google Play Store for Android and the Apple App Store for iOS.
How do I add a camera to the iCSee App?
You can add a camera by scanning the device’s QR code. It also supports to add cameras by manually entering the device ID, or searching for it on the same network.
Can I view live video feeds through the iCSee App?
Yes, iCSee allows live video streaming from connected cameras directly to your mobile device.
Does the ICSee app support two-way audio communication?
Yes, if your camera supports two-way audio. iCSee enables communication through the app.
Does iCSee work without the internet?
For remote access, you are required to have a proper internet connection.

I used ip camera but not configration pc this software
It is very simple just download this app and connect your camera localy and click on search. It will fetch detail automaticaly.
I have entered the data according to the guide but there is a warning that the user id does not exist even though I have entered the user id and password according to my account in the application
Please change password in the application first, then try connect
Why changing the password is mandatory?
There seems to be something suspicious, I get the same error message and my credentials are 100% valid, so I don’t have any reason to change.
i keep getting can’t find device when trying to login
Try to check your network setting specially IP address.
I have message “The user is locked”
maybe you entered the wrong information many times. So there is nothing to worry please wait for an hour, it will be unclocked automatically.
does CMS has an option to configure what video resolution (SD/FHD) and where to find it ?
yes, it has.
Vettem egy iCSee kamerát, kültéri. Márciusban jár le az 1 év. Múltkor fel akartam vinni a padlásra ablak elé. Nyáron ment, most egy utolsó próbát csináltam, és egyszer csak lefagyott a kamera. LED lámpái azóta égnek. RRESET gombbal is sokszor próbáltam újra indítani, nyomtam 15 másodperceket is, 60 mp is, nem csinál semmit. Kódokat nem olvas be. Nem mozog. Újra telepítettem a Redmi11 note új telefonomba is az alkalmazást, úgy sem csinál semmit. Hiába dugtam rá az ETHERNET kábelt is, meg le. stb stb. Márciusban meg lejár az egy év! Nem találok kamera szoftvert sem, hogy esetleg újra lehetne telepíteni. Mi a megoldás? Köszönettel: Tibor
Ask in english
Is it the camera IP address you put in or the modem IP address?
Camera/NVR IP address.
Welcome! Unfortunately, I cannot download the card data to a PC. You can’t see the data. How can I download the data on the card?
Please elaborate you question. Sure! To download data from your camera’s memory card using ICsee for PC:
Install ICsee software on your PC.
Connect the camera to your PC
Able to see Record, there is no need to download.
TH ICSEE CAN IT WORK FOR PC
Yes it Can work ON PC.
Hello,
I have a wifi camera, I don’t have a recording device, I watch everything via mobile.
How should I fill in the IP address and other data?
Could you give me a little help with that? Thank you
Certainly, I can provide some general guidance on how to set up your Wi-Fi camera for viewing on a mobile device without a dedicated recording device. Here are the steps you might follow:
1. Connect the camera to your Wi-Fi network.
2. Find the camera’s IP address in its settings.
3. Download and install the mobile app from the camera’s manufacturer.
4. Open the app, add the camera, and enter its details, including the IP address.
5. Optionally, set up port forwarding on your router for remote access.
6. Enter the camera’s username and password.
7. View the live feed on your mobile device through the app.
I managed to connect locally, but my camera is on one network and my laptop is on another, is there any solution how to connect it to work?
Yes, You can Watch This Video.
https://www.youtube.com/watch?v=auPQ1oQ4dCM
Hi, i wanna ask. what could be the reason when i click find ip address but nothing come out. Then, i try to add the device manually by write down its ip address, but it show “Can’t find the device”. But, i can access and see the cctv from my phone (icsee app). Did you know what could be the reason is where i cant find any camera listed on cms? Thank you
The issue might be due to:
Firewall: Check if any firewall or antivirus is blocking the connection.
Network Configuration: Confirm both the CMS and the camera are on the same network and subnet.
Compatibility: Confirm the CMS supports your camera model.
Troubleshoot by pinging the camera’s IP, confirming settings, and checking for errors in CMS logs. If the problem persists, contact support.
Thanks for sharing this guide on ICSee! I’ve been looking for a reliable surveillance app for my PC, and this post really helped clarify the download process for Windows and Mac. Excited to try it out!
Great post! I’ve been looking for an easy way to use ICSee on my PC, and your instructions were clear and helpful. Excited to give it a try on Windows 10! Thanks for sharing!