Here you can download the XVR Pro CMS App for your Windows 11/10/8/7 and MAC. Configure this application for Windows and for MAC. This is the CMS software for viewing the CCTV cameras on the computer.
This is the Windows application developed by the Chinese CCTV company for monitoring and managing the CCTV cameras on the PC. By using this CMS software you can add your cameras on your computer whether it is Windows or MAC.
This is a very common CCTV camera brand for making IP cameras, stand-alone cameras, DVRs, and NVRs. They provide all kinds of solutions for the CCTV security system.
This CMS is one of the solutions provided by this company for video management of CCTV systems. By using this application you can also view the recording of your CCTV.
So download the setup file of this XVR Pro for PC CMS for watching and managing your CCTV system on your PC.
XVR Pro CMS is Compatible with Windows 7/8/10/11 and MAC

Here is the software setup file that is available for the download of this application. You can download it easily and also you can read how to install the setup file of this application and how to configure your cameras on this application.
The setup file is available for only Windows 7/8/10 users not for the MAC OS. But if you are looking for MAC then we have the solution for that.
Here are the two methods for having the XVR cameras on the computer. The first method is only for Windows but the second method is for MAC as well as for Windows.
XVR Pro (Windows)
Here is the link available for this CMS. Download this program for watching the CCTV on your laptop by clicking the link available below.
This link is only for the Windows users not for the MAC. The download link is fully secured so do not worry about the security issues. Simply click on the downloaded link to download the setup file.
XVR Pro (Mac)
There is no CMS available for the MAC but you can view your cameras on your computer. The company does not provide any solution for MAC users.
If you are looking for MAC then we will tell you how can you connect your CCTV cameras to your MAC. To do this you need to use a third-party tool and with this software, you can have your mobile application on your PC.
This tool is called an emulator and we will also discuss how can you install this software. Read the second method for doing so.
What is XVR Pro CMS?
This is the software program provided by the XVR company for watching its cameras on Windows. This software program will allow you to connect your CCTV to your laptop. By using this app you can also configure your IP cameras on your computer.
This is also useful for managing the CCTV cameras on your PC by using the options given in the application like viewing the recording of the CCTV, PTZ controlling, network management of CCTV camera devices, etc.
Features of this application
There are so many good features available in this program like playback view, controlling of pan tilt zoom cameras, user management, customized live view of the cameras, etc.
You can easily manage your CCTV cameras on your computer without touching the main screen of the CCTV system. Here are some highlighting features are given below.
- Live view on your Windows.
- You can take the screenshot of any camera.
- Any time playback options.
- Allow users to take back-up.
- Direct record on the PC.
- Control your PTZ cameras.
- Two-way audio streaming.
- Multi-channel View.
- Device management.
- IP camera management.
- Create, modify and delete the devices.
What is the use of this software?
The main use of this CMS is to view CCTV on the PC. By using this application you can connect your CCTV system on your Windows and you can also connect on the MAC.
This is also useful for managing and maintaining the CCTV cameras on your PC. This CMS having so many useful options in order to manage the device on the PC.
You can also see and backed up the recording of your security cameras on your PC. So if you have cameras of XVR running on your mobile device and you want it on your PC then this is the best solution for running your CCTV cameras on the computer.
Configuration of this app for Windows
By using this application you can connect your cameras to your computer. Here we will discuss the two methods for doing so. By the first method, you can have your cameras on your Windows and by the second one, you can connect cameras on your MAC and also on Windows.
In the first one, we will use the software program provided by the company and in the second one, we will going to use the emulator program for connecting the mobile application on the MAC and Windows.
1. Method # Configuration of this CMS
For this method, you need to download the setup file from the given link available above. The downloaded file will be in the compressed format and you need to extract the setup file before using it.
For the extraction, you may use the Winrar or Winzip. After the extraction of the file save it on your PC and follow the steps for installation and configuration.
1. STEP # Installation of this software
Now find the saved file. Right-click on that file and then you will see some options, choose Run as administrator. Now your system will ask for permission for the installation of the app. Click on the Yes button and then the software is about to install on your computer.
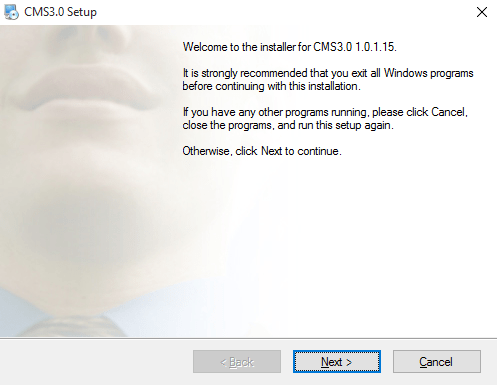
Now a welcome screen will appear for the installation. Here you just need to click on the “Next” button.
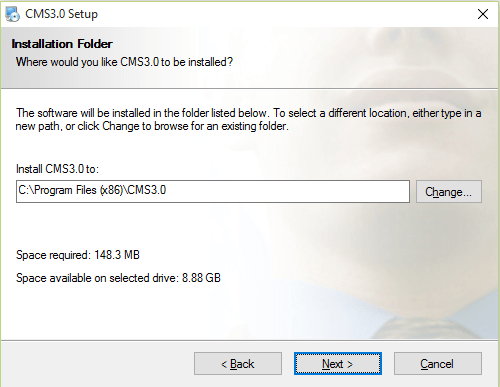
On this screen, you need to just select the installation directory for the installation. Click on the “Change” button and select a folder where you want to install the software. After selecting the installation directory click on the “Next” button.
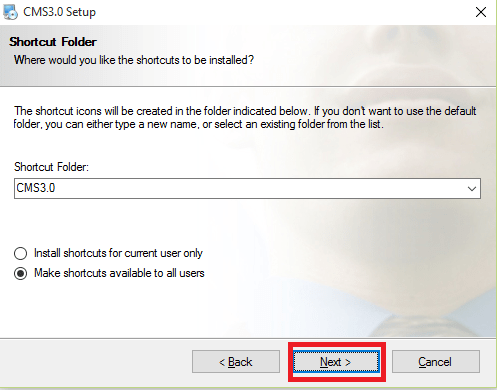
Here you can make the name of a shortcut folder where the shortcut will appear for the application. Then click on the Next button.
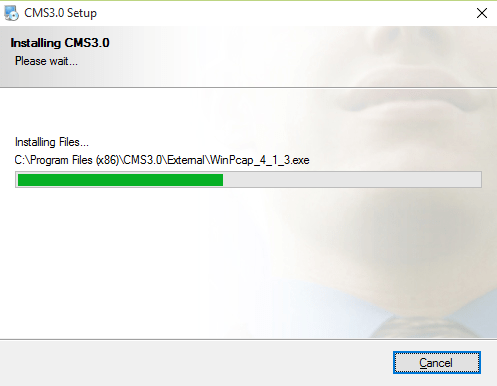
Now the installation will begin. Wait for some time to finish this. After finishing the installation, you need to move to the next step
1. STEP # Login to the CMS
After finishing the installation of the CMS, you can find the shortcut icon on your desktop. Find that icon and double-click on that. Now the software will be running on your computer.
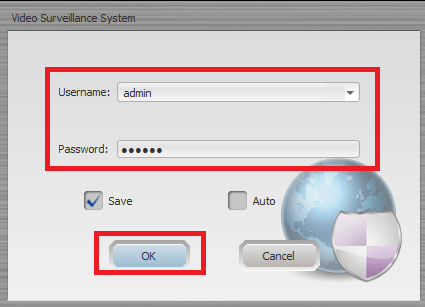
Here put the “admin” in the username and the password of the program will be “123456”. Put it in and click on the “OK” button and now you can see the main control panel of the software.
Now you need to just add your device into the CMS for watching your security cameras on your PC. For doing this see the next step.
3. Step # Adding the cameras on the CMS
Now on the control panel, you can see the option name “Device Manage“. Click on that option.
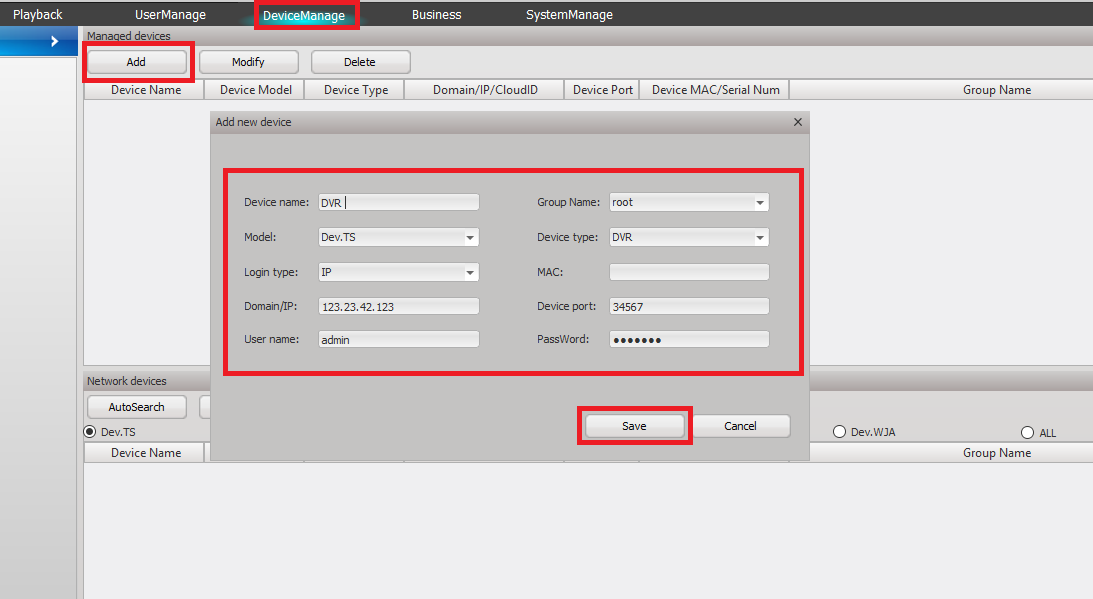
Now here is the screen where you can add your CCTV device into the CMS. Click on the “Add” button now you can see a new window asking for the device information for your device.
Now select the login type and according to that fill the device’s information into this CMS. Then press the save button.

Now you can see your device information on this screen. To watch the cameras on your screen you need to move the main screen of the application.
4. Step # Camera live view on the app
Click on the “Monitor” button of the main menu and now you will move into the live view section of the software.

Here you can see the device name under the root section. Now double-click on the device name and then your cameras will be connected to your PC and you can see the live view of your CCTV on your PC.
2. Method # Installation by Using the Bluestacks
In this method, we will use a third-party tool called emulator and try to run the mobile-based application on your PC.
Because of XVR does not provide a solution for MAC, so this method is very important for MAC users. To use this method, you need to download an emulator for your PC.
There are so many free emulators available but here we use the Bluestacks because it is one of the best available emulators.
So download the Bluestacks for the following link then follow the steps given below for connecting your cameras on your MAC or Windows.
- Click here to download the emulator program(Bluestacks).
- After downloading the setup file of the emulator, run it on your PC.
- Follow the instructions in the installation of Bluestacks.
- After completing the installation of an emulator, you will find its shortcut on your system.
- Double-click on the icon to run the emulator on your computer.
- Now, the emulator will ask you for some configuration.
- Choose the desired language for the emulator.
- Now it will ask you for the email account.
- Sign in to the emulator with your email account details.
- Then you can get the main screen of the emulator.
- Here you can see an icon of Playstore or Appstore (for MAC).
- Click on that icon.
- Now search for your desired application.
- Install and run it on your mobile device.
- Now you can add the cameras to the application.
- After adding the camera, you can see the live view of your camera on your system.
Conclusion
This is the software for connecting the existing CCTV cameras on the PC. This software has so many good features and it is very easy for the users.
By using this CCTV app you can easily manage your surveillance cameras on your PC. If you have an XVR CCTV camera setup then this software is very useful for having those cameras on your computer or laptop.
The company provides a CMS solution for Windows users. The method is available for obtaining the cameras on the MAC. Here we discussed the two methods.
The first method is more reliable if you have Windows because in the method we used the official CMS provided by the manufacturer. Prefer the second method only if you have a MAC PC and look for this application for MAC.
So this is all about the XVR Pro CMS Application. We hope this information will be helpful to you. If you have any queries or suggestions please feel free to write to us in the comment box. Thank you for visiting us. Have a nice day.
What is XVR Pro CMS?
It is an app that allows multiple surveillance cameras to connect through it for remote monitoring on PCs.
How to install XVR Pro on my PC?
To install XVR Pro on a PC, download it from its official website or other trusted sources. When you install it, prompts will guide you for the installation.
Which devices are compatible with XVR Pro CMS?
XVR Pro is compatible with various surveillance devices from supported manufacturers, including XVRs, DVRs, NVRs, and IP cameras.
Is it possible to playback recorded footage using XVR Pro?
Yes, XVR Pro provides a playback feature that allows users to search for and view recorded footage from connected devices.
How can I access XVR Pro remotely over the internet?
Remote access is possible if the PC running XVR Pro and the connected devices are properly configured for remote connectivity, including necessary network and firewall settings.
