
Trying to set up your Amcrest cameras on Amcrest Surveillance Pro, but Amcrest Surveillance Pro not working?
You’ve come to the right place. We’ve put together a simple step-by-step guide to handle common PC issues—like login failures, connection errors, the Amcrest Surveillance Pro not opening, or cameras showing up offline. Whatever’s acting up, there’s a quick fix for it, so you can get everything up and running on your own without having to call tech support.
This guide breaks down the most common Amcrest Surveillance Pro glitches and shows you how to fix them on Windows 7, 8, 10, or 11. These steps follow official Amcrest support tips to help you sort out installation bugs, playback errors, device setup issues, and annoying connection drops.
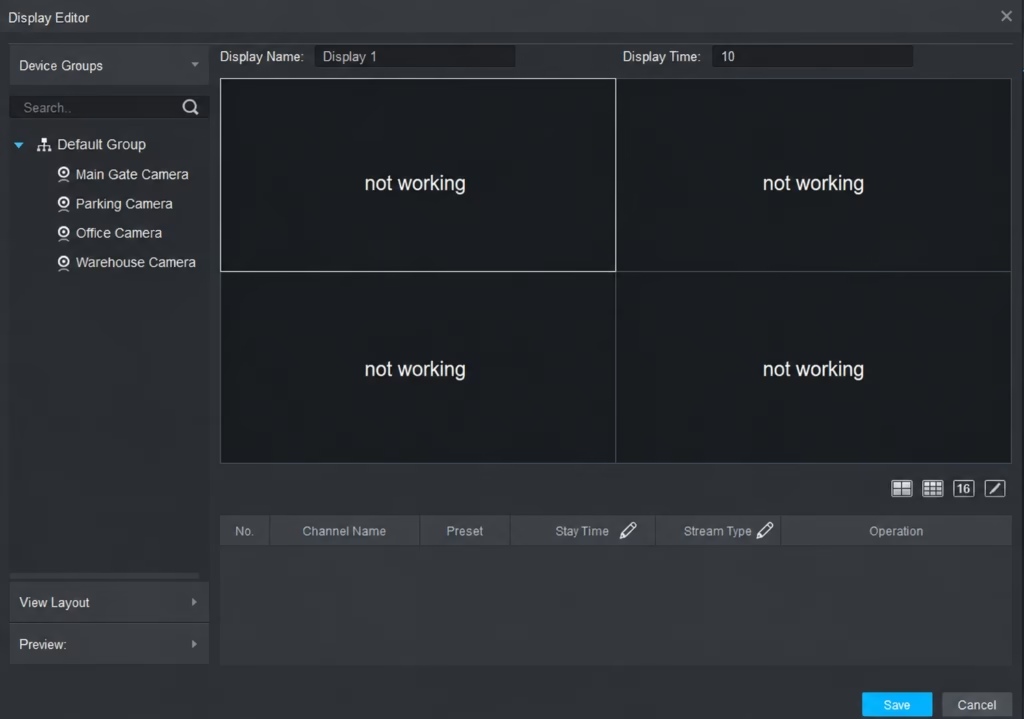
Most Common Problems with Amcrest Surveillance Pro and Their Quick Fix
We gathered real user feedback to track down the most common Amcrest Surveillance Pro issues and put together this quick-fix table. Just find your specific problem below and follow the steps to get everything working again.
| Problem | Quick Fix |
|---|---|
| Login Failed | Verify username & password |
| Camera Offline | Check internet & IP address |
| Connection Failed | Restart router & camera |
| Black Screen | Change stream type |
| Amcrest Surveillance Pro Not Opening | Reinstall the latest version of Amcrest Surveillance Pro |
| Device Not Found | Re-add the camera |
| Software Crashes | Reinstall Surveillance Pro |
| Can’t Connect Remotely | Check P2P/DDNS settings |
Step-by-Step Fixes for Amcrest Surveillance Pro Not Working
If the quick fixes above didn’t do the trick and you’re still running into issues, we need to dig a little deeper. Follow the detailed steps below carefully to get everything sorted out.
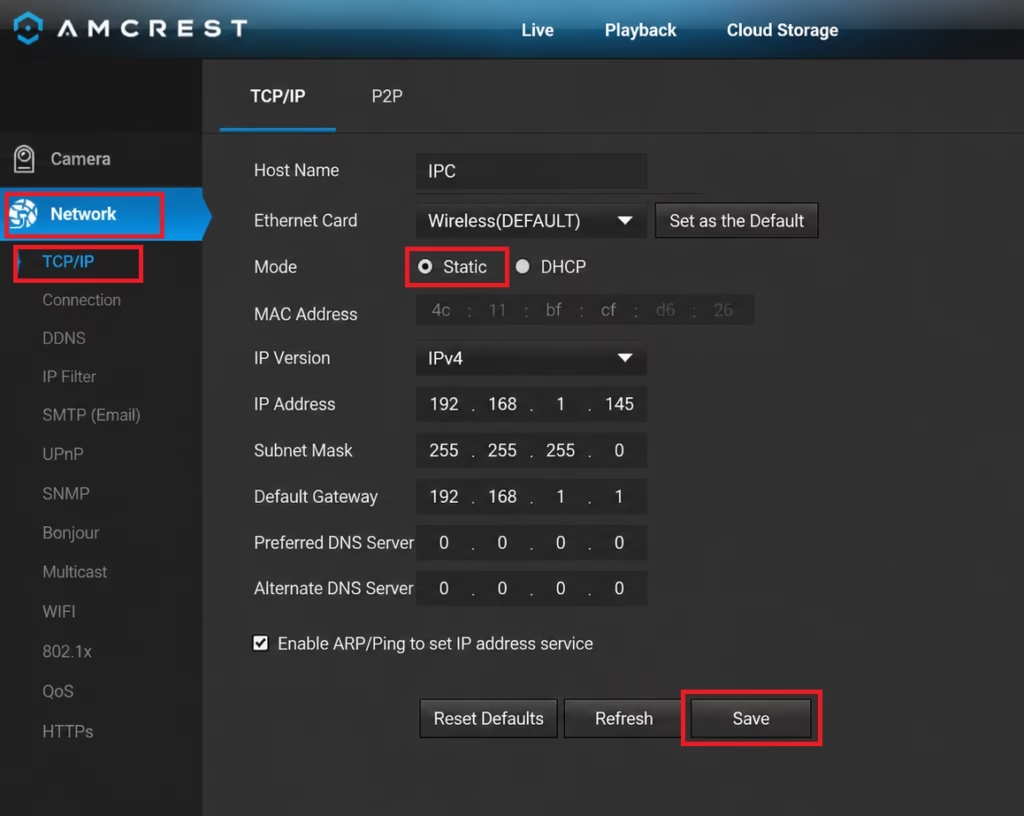
Fix 1: Resolve Local IP Subnet Mismatch & Assign a Static IP
First off, check whether the IP address saved in the software matches your NVR or camera’s actual local IP. If your NVR was set to DHCP and your router rebooted, the IP address likely changed—which completely breaks the connection to the software. To fix this for good, you’ll need to set a static IP for your NVR. Here’s how to do it step-by-step:
- Download and run the Amcrest IP Config Tool from the official downloads portal.
- Scan your network to discover your camera or NVR’s current IP address (e.g.,
192.168.1.105). - Compare this address against the IP listed in Surveillance Pro under Devices > Modify.
- If they differ, update the IP address field in Surveillance Pro to match the IP Config tool readout.
- Set a Static IP: Inside IP Config or the camera’s Web UI (
TCP/IPmenu), switch the network mode from DHCP to Static to prevent future IP drifting.
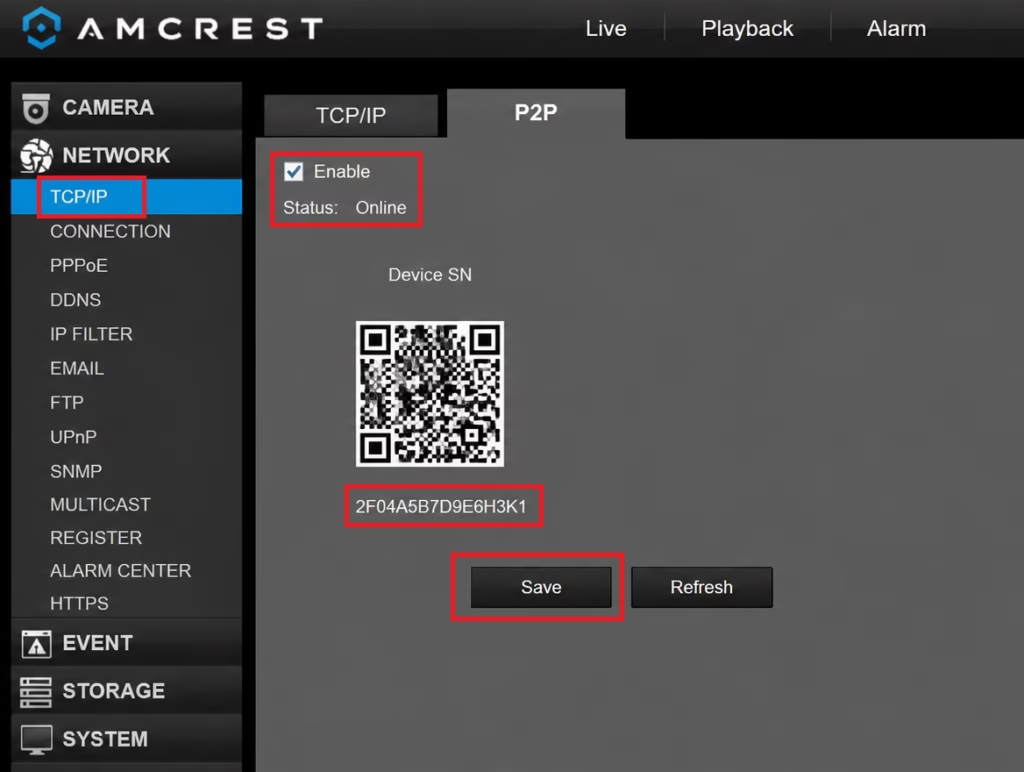
Fix 2: Resolve P2P Remote View Offline Issues (Offline Issue)
When connecting via a Serial Number (S/N) instead of a direct local IP, P2P servers can lose sync.
- Log into your camera’s web UI via a web browser using its local IP address.
- Navigate to Setup > Network > P2P.
- Verify that the P2P Status displays Online.
- If it shows Offline, change your camera’s DNS settings under Network > TCP/IP:
- Primary DNS:
8.8.8.8(Google Public DNS) - Secondary DNS:
1.1.1.1(Cloudflare DNS)
- Primary DNS:
- Save the configuration and check if the P2P connection re-establishes.
Fix 3: Configure Windows Defender Firewall & Port Exceptions
Windows Defender frequently blocks incoming video streams from unverified binary files after Windows Updates.
| Port Type | Default Port | Function |
| TCP Port | 37777 | Main video transmission & control stream |
| HTTP Port | 80 | Web UI access & API management |
| UDP Port | 37778 | Real-time media playback & discovery |
| P2P Server | Variable | Remote access relay when port forwarding is omitted |
Adding the App Exception:
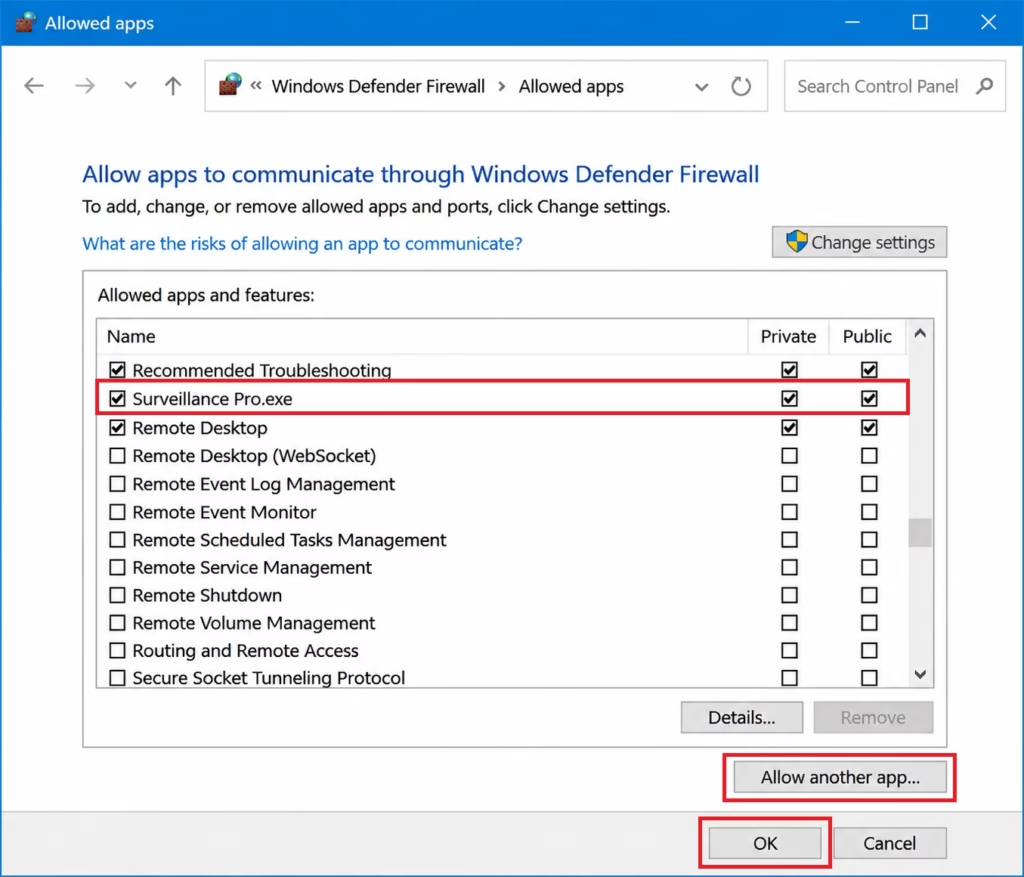
- Open Control Panel > Windows Defender Firewall > Allow an app or feature through Windows Defender Firewall.
- Click Change Settings, then select Allow another app…
- Browse to
C:\Program Files (x86)\Amcrest\Amcrest Surveillance Pro\and selectSurveillance Pro.exe. - Check both Private and Public checkboxes, then click OK.
Fix 4: “Live View Black Screen” via Display Settings
If your cameras connect (green status icon) but show black screens in Live View, the issue is hardware acceleration rendering.
Pro Tip: If your camera and NVR support H.265/H.265+, you can use it to reduce bandwidth and storage usage. However, if Amcrest Surveillance Pro shows a black screen, no live video, or fails to display the camera feed, switch back to H.264H and optimize the remaining video settings as follows:
- Go to Amcrest NVR and log in.
- Click the gear icon (Settings) in the menu.
- Select Video Options.
- Change Encode Mode, Quality, and Resolution.
- Lower the default live view stream from Main Stream to Sub Stream to check whether a bandwidth bottleneck is causing the stream to fail.
- Click Save and restart the client application.
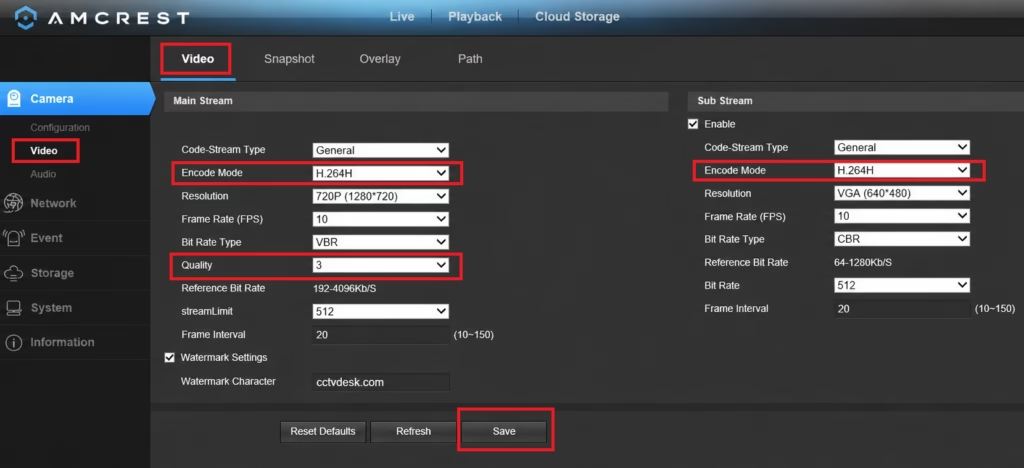
Expert Tip: Black screen issues are most commonly caused by an unsupported H.265 codec, excessively high bitrate, very high resolution, or outdated firmware. Switching to H.264H, enabling the Sub Stream, and lowering the bitrate usually resolves the issue within a few minutes without affecting the recording quality significantly.
Fix 5: Reset PC-NVR Daemon & Recording Storage Paths
If continuous recording or storage management in Surveillance Pro crashes, the background PC-NVR service has likely failed.
- Press
Ctrl + Shift + Escto open Task Manager. - Locate PC-NVR Service or
PC-NVR.exeunder background processes and click End Task. - Re-open Surveillance Pro, navigate to PC-NVR Management, and click Start Service.
- Verify that the target disk drive for stored recordings has at least 20 GB of free, unallocated space and isn’t locked by read-only permissions.
Fix 6: Performing a Clean Software Re-installation
Corrupted configuration cache files can cause Surveillance Pro to crash immediately on launch.
- Uninstall Amcrest Surveillance Pro via Add or Remove Programs.
- Open Windows File Explorer and navigate to
%appdata%(e.g.,C:\Users\YourName\AppData\Roaming). - Delete the folder named Amcrest or Surveillance Pro.
- Re-download the latest software build from the official Amcrest site and install as Administrator.
Note: If you’re still stuck, there’s one last thing you should definitely try. If your NVR or camera is running outdated firmware, go ahead and update it. You may also see this Amcrest View For PC.
Similar Post
FAQs
Why does Amcrest Surveillance Pro show “Camera Offline”?
The Camera Offline error usually means the software cannot communicate with your camera or NVR. Check that the device is powered on, connected to the network, and has the correct IP address. Also, confirm that the camera is reachable from the same network.
How do I fix the black screen in Amcrest Surveillance Pro?
To fix the black screen issue:
Change the camera’s Encode Mode to H.264H.
Lower the video resolution and bitrate.
Enable the Sub Stream.
Update your graphics driver.
Install the latest version of Amcrest Surveillance Pro.
Restart both the camera and the software.
Why can’t I log in to Amcrest Surveillance Pro?
A login failure is usually caused by an incorrect username or password, changed administrator credentials, or an account permission issue. Verify your login details and ensure the user account has remote access permission.
Why is live view not loading in Amcrest Surveillance Pro?
Live View may fail to load if the camera uses an unsupported video codec, the bitrate is too high, the network connection is unstable, or Windows Firewall is blocking the software. Switching to the Sub Stream often resolves the issue.
Final Words
Most Amcrest Surveillance Pro issues—like offline cameras, login failures, black screens, or connection drops—usually come down to your network settings, app version, or camera configuration. Work through the fixes in this guide step by step, and your system should be back up and running in just a few minutes.
Still stuck? Reach out to Amcrest Support or drop a comment below with your error message and device model so we can help you figure it out.
