We are giving here the demonstration to view recording on Hikvision. We install a CCTV surveillance system anywhere for monitoring and recording. A surveillance system is a set of NVR/DVR and cameras.
Wherever we integrate them our purpose is to watch activities and trace any untoward incident. To track and trace, we have to record activities.
If you want to view the footage of the CCTV Camera on Hikvision DVR or NVR, then there are a few things you need to be aware of first.
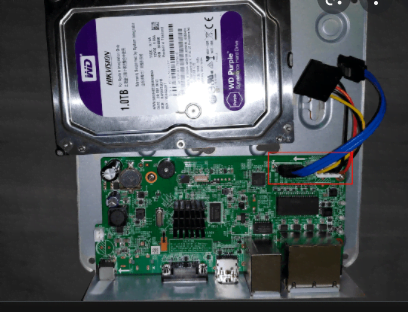
We need to install a hard disk on the recorder. Then we have to know some basic functions to format the hard disk and make it functional for preserving activities. After that adjust the quality of the footage by using its features. Then view the stored files in various timelines.
This article will give you full insight into how you will record any activity and view it.
Pre-requisites For Recording
There are a few important points that we need to confirm before going for checking the clips. To view the recording on Hikvision, hard disks are installed in the recorder. There are multiple types of hard disks. 500GB, 1TB, and 2TB Hard disks are the most common types, which are regularly used in the system.
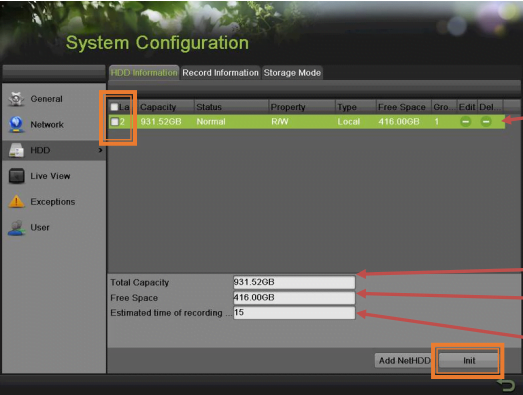
When we install any hard disk on the recorder, it asks us to format it before going for capturing the clips. For that, we right-click anywhere on the monitor screen to open the quick menu. After reaching there we go for the main menu.
A window opens, where many functions are given. Select the “HDD” option and click it. It will be asking you to format the drive. You have to press the format button. It will format the disk and the storing begins.
Common Recording Types
This way storage begins. You can set the HDD property to redundancy, read/write, or read-only. Redundancy property means, the activities are being stored in the read/write memory and the HDD simultaneously. This property is set for highly sensitive zones.
Suppose we lose a recording from one place, it is stored at another place as well.
We set the ‘read only’ property to prevent the activities to be overwritten when the HDD capacity becomes full. In the read/write option we go for storage and it overwrites when the HDD is full.
You have to select the option between continuous scheduled storage and motion sensor storage. Continuous recording means every activity is being recorded.
When we go for the motion sensor footage, then it will only record the activity when it realizes any motion in that camera zone. This type of recording is more common as it saves space on the hard disk and increases its capacity to record in terms of the number of days.
How To View Recording On A Hikvision DVR/NVR?
To check the recording on a Hikvison recorder, go the following way.
The first step is that recording is taking place. The next thing is that you have to know is the date, timing, and the camera you have to view. You will get to know every step very clearly.
The Hikvision CCTV Surveillance system is operational. It is functioning and you are going to check some past activities. Right-click the mouse. It will open a quick menu. The menu has many functions given on the screen.
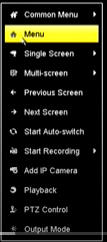
You find here so many functions given. But for our purpose to view the recording, we will go to the main menu of it. Select the menu option and click it. The following page opens.
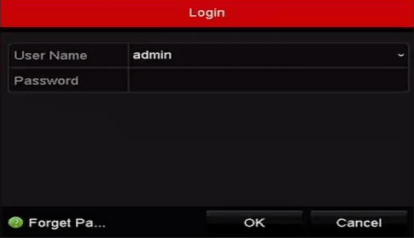
The main menu will only open if we provide the username and the password. It is designed so to protect the safety and security measures. By default, its user name and the passwords are “admin” and “12345” respectively. though you can reset them and recreate them of your own choice.
Put the username and the password and after that press the login button. The gadget logs in and opens the homepage for you.
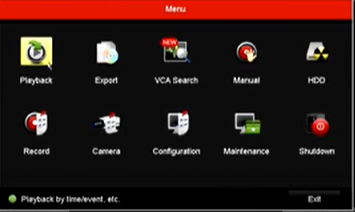
Here, you will be finding all the functions the device has. The list gives a consolidated idea about the usability of the Hikvision DVR/NVR. We have to view the recording on the Hikvision recorder. So we select the ‘Playback’ option. Click it for the next level.
This page opens after clicking the playback option.
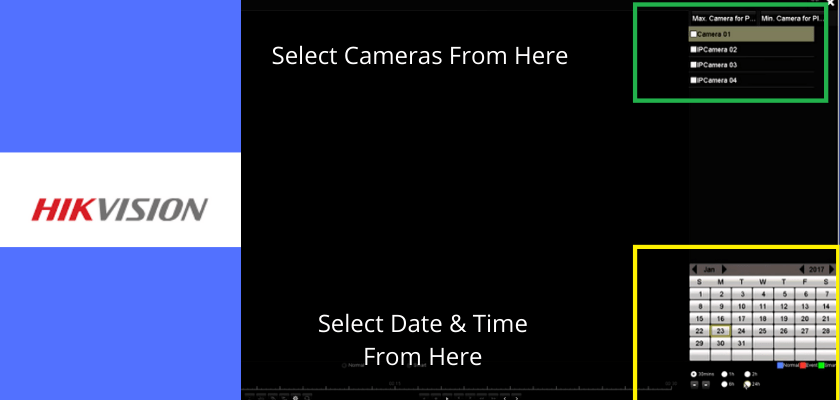
Here you have to select the two main things. The first thing is about the calendar. You have to choose the month and the date option. It can be easily selected. When you select the camera, then the number of days it has recorded the events will be highlighted.
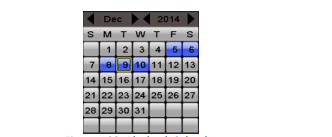
Mainly they are marked in red or blue colors. It is done to identify the number of days recording has taken place on that particular camera. Select the date from here.
Now you have to select the number of cams you want to view the memory. It can show you the storage of one cam at a time or multiple cams at a time.
The number of cameras listed is given on the right-hand upper corner side. Select the camera or cameras which you want to view. It is mentioned here. You can go from one camera recording to 16 cams recording at a time. It is easy to select.
Here, it is visible clearly in this image. Select the cams of your choice to view the recording. You have to choose two things here. The first thing is about the camera & location you want to view and the second thing is about the month and time.
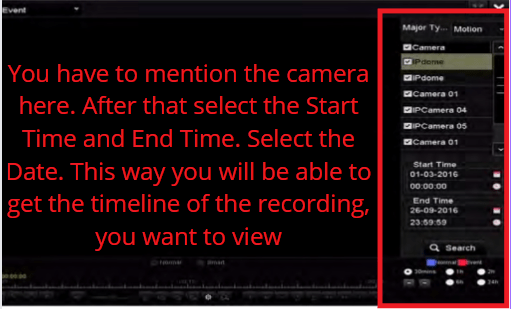
After their selection press the playback option. You can see them on a single screen. If you have selected one cam at a time, you will view one camera recording. If you select suppose 10 cams at a time, it will relay to you on the screen that number of cameras.
Now you have to select from the right-hand side bottom options. You are finding three icons in blue, red and green colors. They denote the different types of recording available.
Blue indicates- Normal Recordings
Red indicates- Event Recordings
Green Indicates- Small Recordings
Then you have to select the 30minutes, 6hours, 24hours timeline on the right-hand bottom dots. Select your timeline.
The moment you select the camera, the number of days it has storage available will be highlighted on the date option.
Here, we have selected one camera and 24 hours timeline. We click them. The timeline and one selected camera appear on the screen.
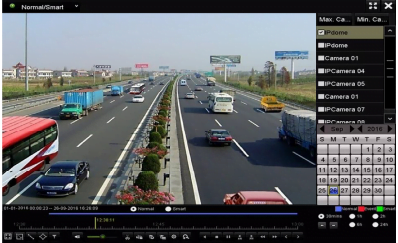
Here, the timeline is given in 24 hours mode. You can move the cursor to select the exact time from the timeline and view your recording.

This way you will view your recording. You are finding some operational switches beneath the timeline. They are for making the tracking easier.

You can view the recording as per your choice. If you are viewing a short clip then no issue. But if you are going for a full-length recording of one hour, 2 hours, or even more, then these buttons will be handy for you. You can pause the footage, and play them, fast forward or fast backward.
The buttons given below are for the following functions.
- There is a pause button
- There is a play button
- You can stop the recording by clicking the respective switch
- You can reverse play
- You can forward play
- You can skip back for 30 seconds
- You can leap forward for 30 seconds
- There is a rewind button
- There is a next day option
- There is a previous day option
The fast forward and fastback word buttons have different speeds. It can be functional up to 5x times.
This is the process of view recording on Hikvision DVRs, and NVRs. This we go for it.
Conclusion
We have shown you here the various stages of tracking and tracing the storage clips for Hikvision Device. It follows a pattern. One function drives to the next function and it goes on until we get cameras on the monitor. By following the systematic process, you can monitor clips.
Hikvision brand is a well-known brand. Its NVRs and DVRs are having top-class functions. It has many deep features. For timeline viewing, it also gives functions for color adjustment and image adjustment. They are given to showcase the footage in a better way.
We have given this extensive illustration to get the monitoring process smoother for clients. If you find any problem in capturing the footage and getting them on the display screen, please share the issue with us. We would love to solve the query.
Thank You.

