The VISIX IP Setup Tool is used mainly by CCTV installers and technicians to manage Visix CCTV devices. This utility tool configures security cameras for a better and more personalized setting.
This post guides users about the VISIX IP Setup Utility Tool and its features. You will get its installation and setup procedures in an illustrative form.
The download button of the 3x Logic IP Tool or VISIX IP Utility Tool is shared below. You have to just press the button and get the application file in an encrypted form. Decompress it to get the executable file for Windows OS.
The Utility IP Device Tool has so many rich features and functions to arrange and manage security surveillance devices to get full control of the system.
What is the VISIX IP Setup Tool?
The VISIX IP Tool is designed and offered by 3xLOGIC Systems Inc. The app was created in 2015 and since then it has been successfully used for VISX device management. It has been updated from time to time.
The VISIX Utility is arranged to guide and help VISIX IP Camera users to set up VISIX Cameras. It helps you set up or modify the IP address, update the firmware, create the device credentials, use audio, reboot cameras, etc.
The 3x Logic Tool integrates security systems with cloud management systems. It makes security management easier, more efficient and more powerful than ever. It supports Visix V series IP cameras. The other apps which support these VISIX Devices are VIGIL Client, View Lite II, and VIGIL VCM.
What are the VISIX IP Utility Tool Features & Functions?
The VISIX Tool has excellent features. We will discuss them here. We have to understand them to take the best benefit of the product.

- VISIX Tool automatically locates devices on a network making it easy to add and configure Visix IP Devices.
- The VISIX Utility can configure multiple IP Cameras at a time.
- The Utility Tool assigns static and dynamic IP addresses to CCTV cameras and manages subnet masks, gateways, and DNS servers.
- It guarantees to update the firmware of all devices to get them updated.
- With the help of this Utility Tool, you can modify the video resolution, frame rate, compression settings, and other image-related parameters.
- The tool allows you to configure accounts and their credentials, and operate other features.
- You can operate security device information, reboot and reset cameras and access log management.
- It has a user-friendly interface to navigate easily.
- The VISIX Utility Tool allows diagnosing and troubleshooting options.
- Users get ONVIF Support from this 3xLogic Utility.
These are some important characteristics of this VISIX Tool.
Download the VISIX IP Utility on a Windows OS
The download button is shared in the post. Get it and open the button. You get the file in a zipped format. Unzip it to download and install on a Windows OS.
The step-by-step is illustrated here. The user can easily understand the functions for guidance. It is a tutorial for this Utility Tool. This Device is easy to install and use. All the features and functions are designed in the software in a very simple way. Even a new user can comprehend them successfully.
How to Operate VISIX Tool on a Windows PC
The complete explanation and demonstration are described here. The step-by-step procedure helps users to operate the tool effectively.
Step 1- Install the Device
When we go to install this app, we take its download button and click it.
The file is in a zipped form, decompress it to install the Utility Tool on the Windows PC.
When we open the application file, we get the following page on the screen.
It is the interface of the VISIX Device Tool.
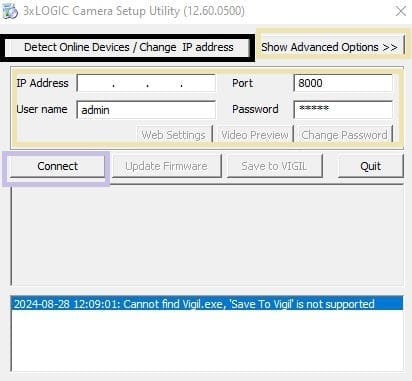
There are many functions and tabs given on the page.
We use them one by one to get a proper understanding of the application.
How to Detect Devices & Configure IP Addresses?
To detect online Visix IP Cameras or modify the device IP address, we click the given tab marked in red. The tab is ‘Detect Online Devices/ Change IP Addresses.’
Click the button for the action.
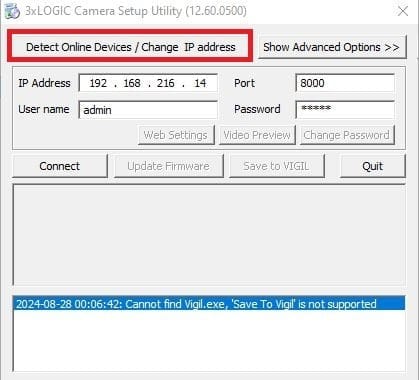
When we click it, we get the following page on the screen.
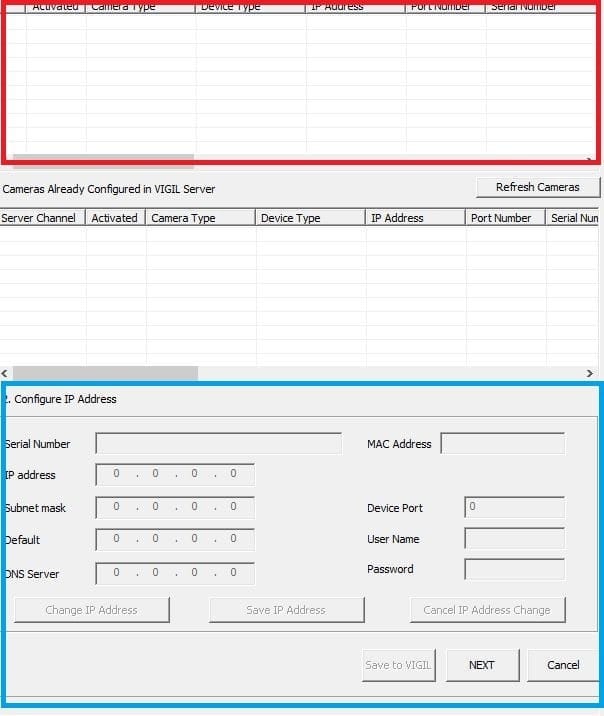
It can search the device or we can connect IP Cameras through the LAN Cable as well.
When the devices are connected, we get this page. This way, you can detect online cameras and study them.
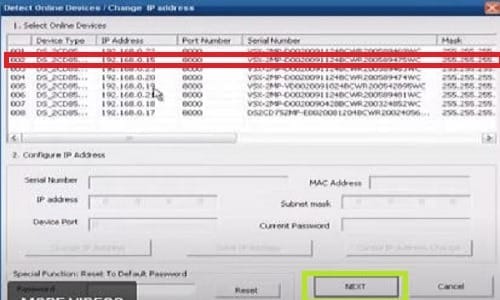
Here you have to select the IP Camera for which you want to change or modify the IP address.
Select the device.
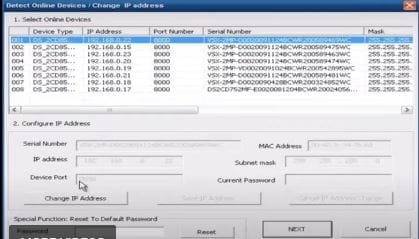
When you select the device, its IP address and subnet mask shows up.
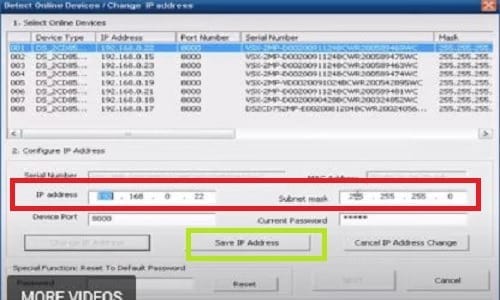
Change the IP address and subnet mask as required and then press the save button.
This way, you will modify and change the IP address and Subnet Mask.
How to Update Firmware, Reboot Devices, Set Images & Synchronise Time?
To perform the above functions open the interface of the Utility Tool and press the ‘Show Advanced Options’ tab shown on the screen.
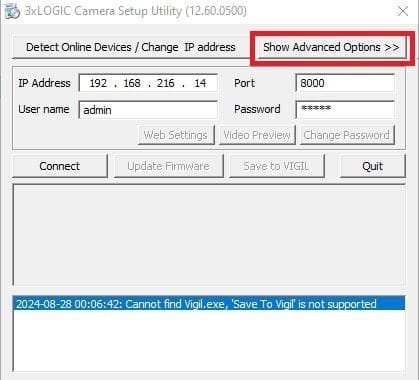
When you press the tab you get the following page on your Windows screen.
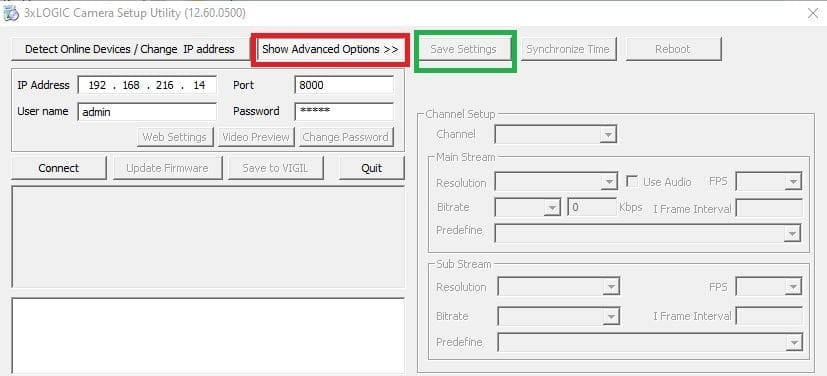
The page shows the advanced options given on the tool.
When cameras are attached to the tool, you get this page on the screen.
You can see various options given here.
Firmware– You can update the device firmware. An updated firmware keeps the device fast and functional.
Reboot– We reboot a device to make it functional properly after updates or app installations. Rebooting is necessary after installing updates or software, recovering from an error, or reinitializing hardware or drivers.
Image Setting– You can set images like manage resolution, bit rate, frame rate, colour combinations, sharpness, etc.
Subnet Mask– The Subnet Mask separates an IP address into its host and network portions. You can modify it from the page.
Time Synchronization- Adjust device times for proper scheduling of the recording and remote handling.
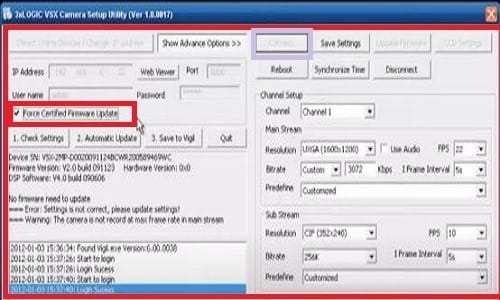
All these options can be handled with this advanced options tab.
Conclusion
The VISISX Setup Tool is detailed in the post. Its download button is shared to get the app on a Windows PC. The installation and configuration steps are demonstrated in the post. It guides users to use the tool in a better fashion.
The step-by-step analysis helps users to know its features and functions and comprehensively use them. The images and descriptions support users to modify IPs, firmware updation, image settings, device reboot, etc.
Kindly go through the post and share your opinions. You can write to us in the comment section. If you have queries regarding the app or you want to know about any other CCTV App or Config Tool, kindly inform us.
We respond to queries. Your messages are important for our encouragement.
Thank You.
What is the VISIX IP Utility Tool?
The VISIX IP Utility Tool is a software application designed to help users manage and configure VISIX IP cameras and other network devices. It functions spotlessly and updates devices.
How do I install the VISIX IP Utility Tool?
The tool is given on the official website or other trusted CCTV websites. Download the tool from there, run the installer, and follow the on-screen instructions to complete the installation.
What operating systems are compatible with the VISIX IP Utility Tool?
The VISIX IP Utility Tool is compatible with Windows operating systems, including Windows 7, 8, 10, and 11 versions.
Can I use the VISIX IP Utility Tool to discover all IP cameras on my network?
Yes, the tool can automatically discover and list all VISIX IP cameras and other compatible devices on the network.
How do I change the IP address of a camera using the VISIX IP Utility Tool?
Select the camera from the device list, click on the “Change IP Address” option, enter the new IP address, and save the changes.
Is it possible to reset a camera to factory settings through the VISIX IP Utility Tool?
Yes, you can reset a camera to its factory settings by selecting the device and choosing the “Factory Reset” option.
How do I update the firmware of my IP cameras using the VISIX IP Utility Tool?
Download the latest firmware from the manufacturer’s website, select the camera in the tool, and use the “Update Firmware” option to upload and install the new firmware.
Can I configure multiple cameras simultaneously with the VISIX IP Utility Tool?
Yes, the tool allows you to configure multiple cameras simultaneously by selecting multiple devices and applying settings in bulk.
How can I access the camera’s live feed using the VISIX IP Utility Tool?
The tool provides a direct link to the camera’s web interface, where you can access the live feed by logging in with your credentials.
What should I do if the VISIX IP Utility Tool fails to detect my camera?
Ensure that the camera is properly connected to the network, that it’s powered on, and that your computer is on the same subnet. You may also try restarting the tool and the camera.
Can the VISIX IP Utility Tool be used with non-VISIX cameras?
The tool is primarily designed for VISIX cameras, but it may be able to detect and configure other reputable ONVIF-compliant devices.
