
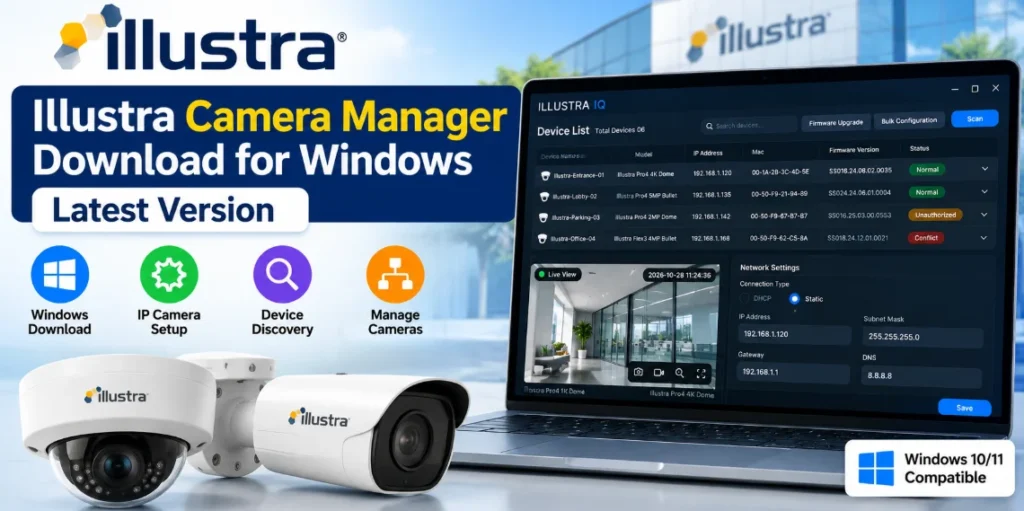
If you need a desktop utility to discover and configure compatible Illustra IP cameras, Illustra Camera Manager provides a central interface for network discovery, camera settings, firmware upgrades, and selected bulk configuration tasks. Instead of opening every camera’s web interface separately, you can use the application to find supported cameras on your network and access their available settings from one screen.
In this guide, you will learn how to download Illustra Camera Manager for Windows, install and open the application, scan your network, resolve camera status issues, change network settings, and understand its firmware and bulk-configuration features.
Official download: Download Illustra Camera Manager ZIP
Official user manual: Read the Illustra Camera Manager User Manual (PDF)
Before you begin: This guide covers the newer Illustra Camera Manager application, not the older Illustra Connect utility. Confirm that your camera model is supported before using configuration or firmware features.
What Is Illustra Camera Manager?
Illustra Camera Manager is a desktop camera-management utility designed to simplify the discovery and configuration of supported Illustra network cameras. It brings several commonly used camera-management functions into a single interface.
The application can scan a selected network connection, list discovered cameras, display device information, and provide access to supported camera settings. It also includes workflows for updating firmware on multiple selected cameras and applying selected configuration settings through a template.
The available features depend on the camera model and the functionality supported by the installed application release. Camera Manager should not be treated as a universal utility for every IP camera brand.
Illustra Camera Manager Download for Windows
Use the official Illustra-hosted package rather than downloading an unknown copy from a third-party software site.
Download details
- Software: Illustra Camera Manager
- Package:
ILLUSTRA_Camera_Manager_03.00.01.zip - Download source: Illustra-hosted S3 download URL
- Purpose: Supported camera discovery, configuration, and management
- Operating system: Windows desktop application; check the supplied manual and package documentation for the exact supported Windows versions
- Package version:
03.00.01, as indicated by the download filename
The filename identifies the supplied package, but it does not independently establish the application’s displayed version, release date, or Windows compatibility matrix.
Note: IP tool for TVT Camera
How to download the software
- Open the official download link above.
- Download the ZIP package to your Windows computer.
- Open the downloaded file’s location in File Explorer.
- Extract the ZIP file to a new folder.
- Review the extracted files and any included installation instructions.
- Launch the supplied installer or application according to the package instructions.
Important: Do not assume the ZIP contains a particular installer filename or that installation is a simple one-click process. Follow the actual files and instructions included in the downloaded package.
How to Install Illustra Camera Manager on Windows
After downloading the package, extract it before attempting to run the application. The correct launch method depends on the files supplied in the archive.
- Locate the downloaded ZIP file.
- Right-click it and select Extract All.
- Open the extracted folder.
- Read any included README or installation instructions.
- If the package contains an installer, run it and follow the on-screen prompts.
- If the package provides a portable application, launch it as instructed by the vendor.
- Open Illustra Camera Manager and wait for its main screen to load.
If Windows displays a security warning, verify that the file came from the official Illustra download source before deciding whether to proceed. Do not disable Windows security protections merely to run the application.
If the application fails to open, check the package documentation for operating-system requirements and any required dependencies. The precise installation process should be confirmed against the supplied release rather than assumed from another Illustra utility.
Read this: Bosch Configuration Manager Download
How to Find Illustra Cameras on Your Network
One of the main uses of this Illustra camera discovery tool is finding compatible cameras connected to your local network.
According to the supplied application walkthrough, the main screen offers automatic network scanning and a manual search option.
Step 1: Open the camera discovery screen
Launch Illustra Camera Manager. From the main screen, choose the option to scan the network or search for a camera manually.
Use automatic scanning when you want to discover compatible cameras on a selected network connection. Manual search is useful when you already know the relevant IP details and want to look for a specific device.
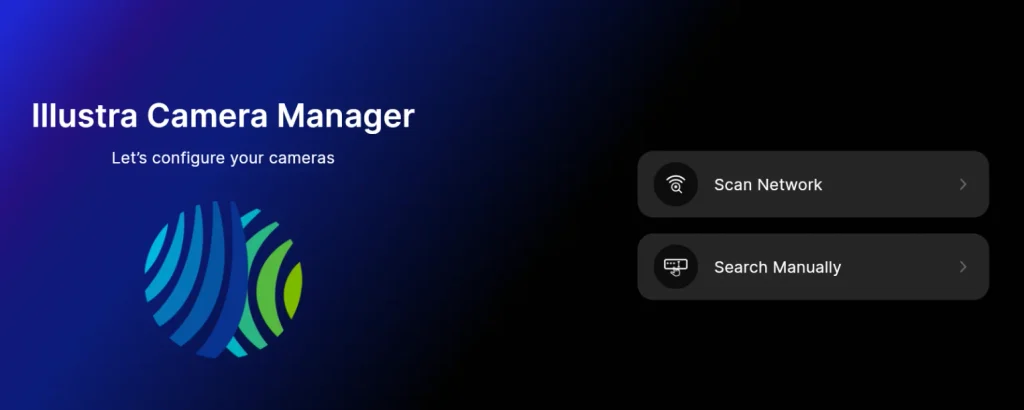
Step 2: Choose Wi-Fi or Ethernet
The application walkthrough describes two scanning choices:
- Wi-Fi: Scan through the selected wireless network connection.
- Ethernet: Scan through the selected wired network connection.
Select the interface to which your camera network is connected. For a wired CCTV installation, Ethernet is generally the appropriate choice when the cameras are connected through the same wired LAN.
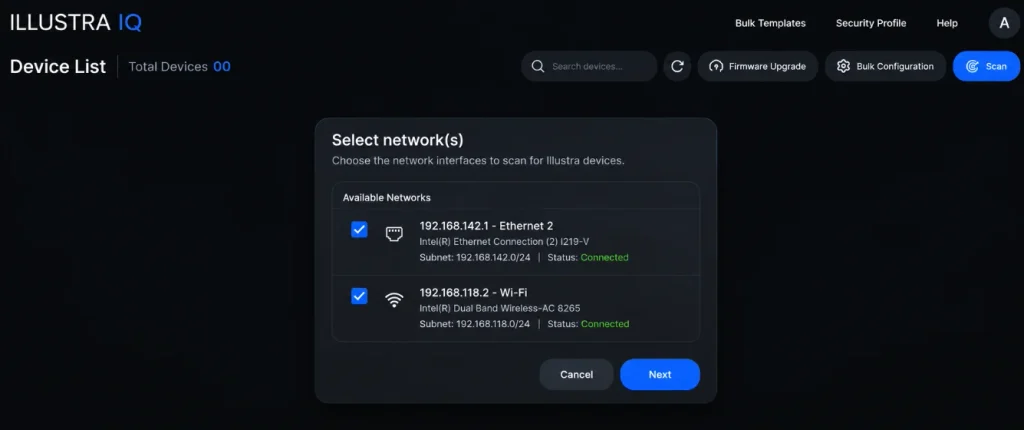
Make sure your Windows computer has a working connection to the camera network. A camera connected to a different isolated network or VLAN may not be discoverable through the selected interface.
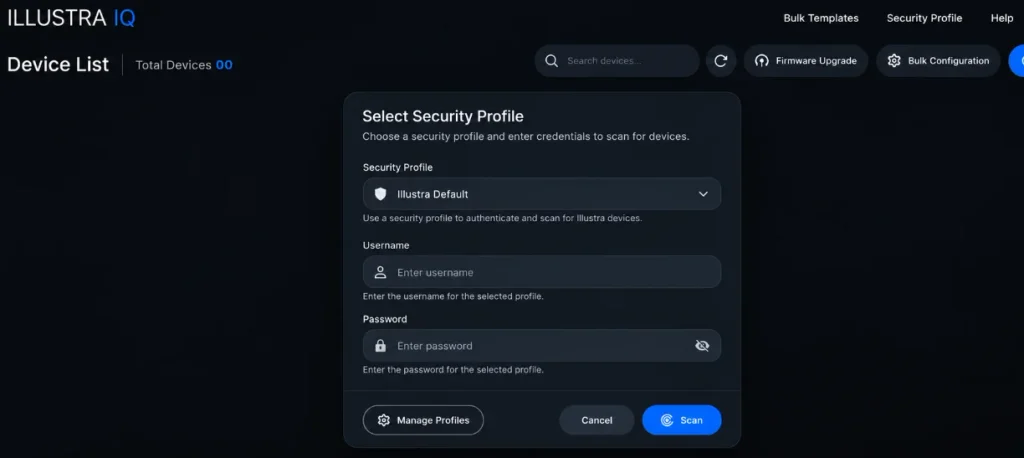
Step 3: Enter the camera login credentials
The walkthrough indicates that the scan process asks for the username and password used by the connected cameras. Enter the valid credentials for your devices.
The demonstration mentions admin as both the username and password for its default Illustra profile. However, this must not be treated as a universal credential for every camera. Actual credentials can differ by model, configuration, firmware, and previous installation history.
Use the credentials configured for your own camera. If you are installing a new or reset device, consult its model-specific documentation for the initial login procedure. Change any default password when prompted or where the camera’s security policy requires it.
image: Enter login detail
Step 4: Start the scan and review the camera list
Start the scan and allow the application to search the selected connection. Compatible cameras that it can discover should appear in the main camera list.
The walkthrough describes device details such as:
- Device name
- Camera model
- Product code
- IP address
- MAC address
- Firmware version
- Camera status
The MAC address can help you distinguish cameras with similar names or identify a device when multiple cameras are installed at the same site.
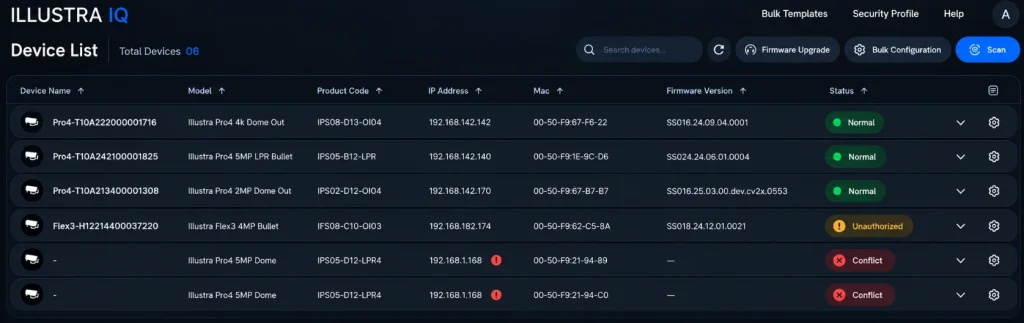
Understanding Camera Status in Illustra Camera Manager
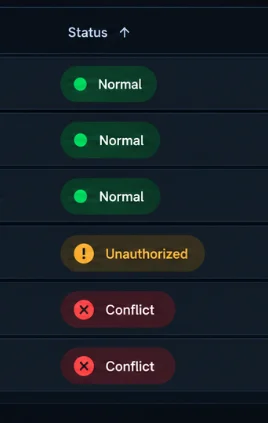
The supplied walkthrough describes three camera states. Understanding them helps you determine what to check before changing camera settings.
Normal
The camera appears in a normal state when the application has connected using acceptable credentials and can access the device as expected.
Select the camera and verify that the displayed model and IP address correspond to the physical camera you intend to configure.
Unauthorized
An unauthorized status indicates that the application could not authenticate to the camera using the supplied credentials.
To investigate:
- Confirm that you selected the correct camera.
- Check the username and password against the camera’s current credentials.
- Correct the credentials in the application where the interface allows it.
- Retry the connection and check whether the status changes.
Do not repeatedly guess passwords. If the credentials are unknown, use the manufacturer’s supported recovery procedure for that exact camera model.
Conflict
A conflict status in the supplied walkthrough indicates an IP-address conflict involving more than one camera using the same IP details.
To investigate safely:
- Note the affected camera entries and their displayed MAC addresses.
- Check the IP assignments in your router, DHCP server, or network configuration records.
- Identify which devices are using the conflicting address.
- Plan unique IP addresses that fit your network’s subnet and address-allocation policy.
- Change the address of the correct camera using the supported configuration controls.
- Confirm that the camera can be reached at its new address.
Avoid changing addresses at random. An incorrect IP configuration can make a camera unreachable or disrupt an existing recording system.
[IMAGE 4 — Camera status examples: Normal, Unauthorized, and Conflict. Reproduce the indicators only from a genuine source image.]
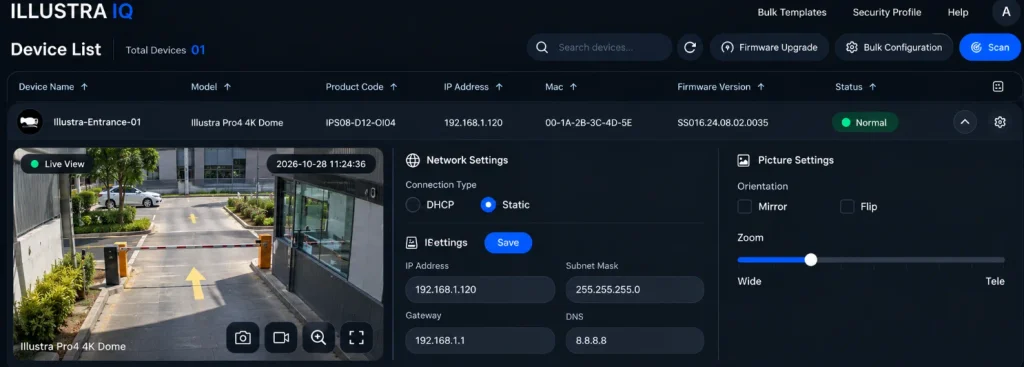
How to Change Illustra Camera IP and Network Settings
Illustra Camera Manager provides access to network settings for supported cameras. The exact controls may vary by camera model and application release.
To review a camera’s settings:
- Find the camera in the main device list.
- Confirm its model, MAC address, and current IP address.
- Open the relevant drop-down or quick-settings control.
- Select the available network settings.
- Review the existing network configuration before making changes.
- Enter the intended values using the controls available for that camera.
- Apply the changes as directed by the interface.
- Check the camera’s connection again using its updated network details.
Before changing the IP address, determine whether the camera uses DHCP or a static address. If you need a static IP, coordinate it with the site’s network administrator to avoid conflicts with other devices and DHCP reservations.
Check the following values where applicable:
- IP address
- Subnet mask
- Default gateway
- DNS configuration
- DHCP or static addressing options
Not every model exposes every setting through the same screen. Do not enter example IP values from another installation without first checking your own network.
Camera Picture, Zoom, and Orientation Settings
The supplied walkthrough also describes quick access to selected picture settings. Depending on the camera’s capabilities, the available controls may include picture adjustments, zoom, and orientation.
To use these controls:
- Select the intended camera from the main screen.
- Open its available quick-settings menu.
- Review the picture and orientation options supported by the model.
- Adjust only the settings needed for the installation.
- Check the resulting image through the camera’s supported viewing interface.
Digital or optical zoom functionality, orientation options, and other picture controls can vary by camera. Do not assume every Illustra model exposes the same options.
For a fixed installation, verify the image after making changes. If the camera is monitoring an entrance, cash counter, or other critical area, ensure that the adjustment does not hide important parts of the scene.
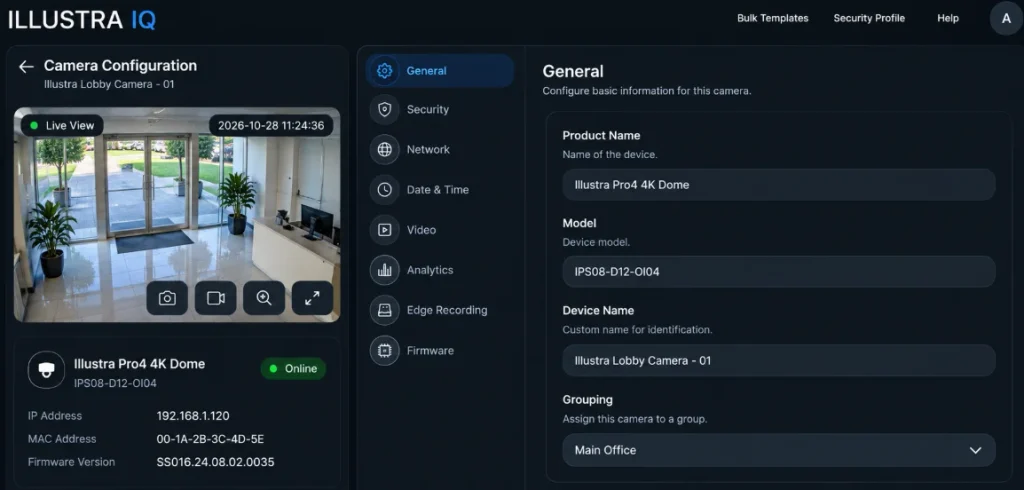
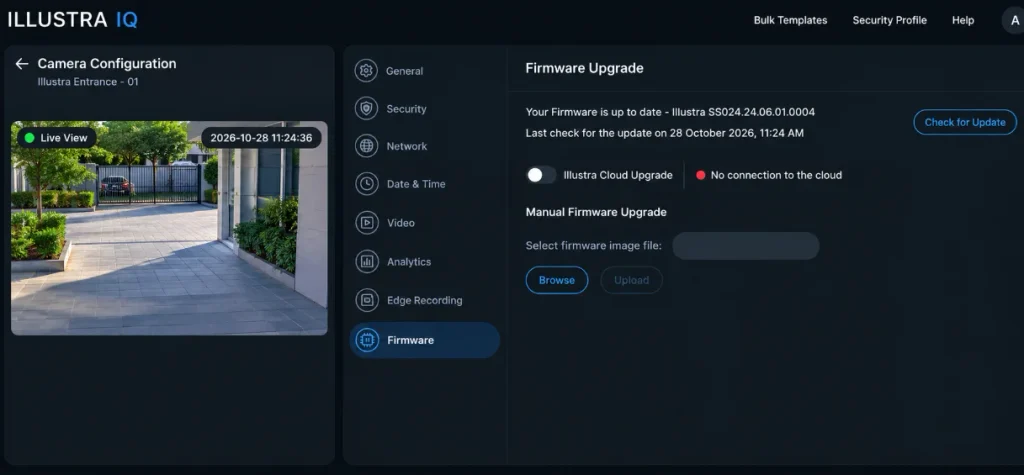
How to Open Advanced Camera Configuration
The configuration control in the application walkthrough opens additional camera settings. The described categories include:
- General settings
- Security
- Network
- Date and time
- Video
- Analytics
- Edge recording
- Firmware
These are categories described in the supplied walkthrough, not a guarantee that every category is available on every camera.
To access the settings:
- Locate the camera in the main screen.
- Select its configuration or settings control.
- Open the category you need.
- Review the current values before editing.
- Apply the changes according to the interface.
- Verify that the camera remains connected and behaves as expected.
General and security settings
Review the camera’s identification and available security options. Use a strong, unique password and follow your organization’s access-control requirements.
Date and time
Check the time zone, clock, and synchronization settings. Correct time is important when reviewing recorded footage or comparing events across multiple cameras.
Video settings
Use the options available for your camera to review video quality and other supported parameters. Balance image quality against available network capacity and recording storage.
Analytics and edge recording
These functions depend on camera model, firmware, and licensing or feature support where applicable. If a category is absent, do not assume the application is malfunctioning; verify the model’s supported features.
[IMAGE 7 — Illustra Camera Manager – Advanced configuration menu showing categories from a genuine application screenshot or the official user manual.]
How to Update Firmware Using Illustra Camera Manager
The walkthrough describes a bulk firmware-upgrade feature that allows an operator to select multiple cameras and initiate an upgrade workflow from the main screen.
Firmware updates require particular care because the wrong image or an interrupted upgrade can affect camera operation.
Before updating:
- Confirm the exact camera model and hardware variant.
- Obtain firmware intended for that specific device from the official manufacturer source.
- Read the relevant release notes and upgrade instructions.
- Back up or record important configuration details.
- Plan the upgrade for a suitable maintenance window.
- Ensure stable power and network connectivity.
Firmware update procedure
- Open Illustra Camera Manager.
- Find the firmware-upgrade control on the main screen.
- Use the upload or selection control to provide the appropriate firmware file, as supported by the interface.
- Select only the cameras that match the firmware package’s compatibility requirements.
- Review the selected devices before starting the operation.
- Start the upgrade and monitor the displayed progress or status.
- Wait for the upgrade process to finish; do not power off or disconnect devices during the operation.
- Verify the firmware version and confirm that each camera returns to an operational state.
[IMAGE 8 — Illustra Camera Manager – Firmware upgrade interface showing the firmware selection and camera selection workflow.]
Important: A bulk-upgrade option does not mean one firmware file is suitable for every Illustra camera. Never select cameras solely because they appear in the same discovery list. If compatibility is uncertain, consult the official release notes or upgrade one confirmed-compatible camera at a time.
How to Use Bulk Camera Configuration
Illustra Camera Manager’s walkthrough describes the ability to create a configuration template and apply selected settings to multiple cameras.
The demonstrated template scope includes selected security, date-and-time, and basic video settings. The available template options may vary by application version and camera model.
A bulk template can save time when configuring multiple cameras in a similar installation. However, applying identical settings to every camera is not always appropriate.
Recommended workflow
- Identify the cameras that genuinely require the same configuration.
- Review their models, firmware versions, and intended uses.
- Create the template using the settings available in the application.
- Check every setting against the requirements of the target cameras.
- Apply the template only to the intended devices.
- Review each camera individually after deployment.
For example, cameras monitoring a warehouse entrance may need different image settings from cameras monitoring a brightly lit office or an outdoor loading area. Shared settings can provide a useful starting point, but each camera still needs an appropriate final configuration.
Illustra Camera Manager Not Finding Cameras? Try These Checks
If the camera discovery scan returns no devices or misses some cameras, investigate the network before changing camera settings.
1. Confirm the network connection
Check that the computer and the target cameras are connected to the intended network. For wired cameras, verify the Ethernet link and the relevant switch ports.
2. Select the correct interface
If your computer uses both Wi-Fi and Ethernet, select the connection associated with the camera network. A scan on the wrong interface may not find the intended devices.
3. Check IP addressing
Confirm that the computer has valid network settings for the camera network. Incorrect subnet configuration can prevent normal communication.
4. Check network isolation
Cameras on a separate VLAN, isolated wireless network, or restricted network segment may not be discoverable from the computer’s current connection. Ask the network administrator to verify the permitted communication path.
5. Verify camera power and connectivity
Check the camera’s power supply or PoE connection, switch port, and Ethernet cable. Confirm that the device is operating before troubleshooting the desktop application.
6. Recheck authentication
If the camera appears as unauthorized, verify its current login credentials rather than assuming it uses the demonstration’s default values.
7. Confirm camera and application compatibility
The supplied walkthrough describes initial support focused on Gen 4 cameras, with dual- and multi-sensor models excluded from that initial scope. It also describes third-party support as a future addition.
Because application support can change between releases, check the current official documentation for the exact model and version you use. Do not assume that a camera from another manufacturer will be discoverable or configurable just because it uses IP networking.
Illustra Camera Manager vs. Illustra Connect
Illustra Camera Manager is the application covered by this download guide. Illustra Connect is a separate, older Illustra camera-management utility referenced in earlier camera documentation.
The older Illustra Connect documentation describes functions such as discovering compatible network cameras, setting IP addresses, checking connection status, firmware upgrades, and bulk configuration. Its supported devices and workflows should not be assumed to match the newer Camera Manager application.
If you are following instructions for a newer Camera Manager release, use its own manual and the package supplied for that application. If your camera documentation specifically directs you to Illustra Connect, verify which utility is appropriate for your device and firmware before installing a different tool.
Is Illustra Camera Manager Worth Using?
Illustra Camera Manager is useful when you need a centralized way to discover and configure supported Illustra cameras rather than opening every camera’s interface individually.
Its most relevant capabilities include:
- Discovering compatible cameras through a selected network connection.
- Reviewing model, IP, MAC, and firmware information.
- Investigating unauthorized and IP-conflict states.
- Accessing supported network, picture, and advanced settings.
- Performing firmware upgrades through the available workflow.
- Applying selected configuration templates to multiple cameras.
Its suitability depends on your camera model, firmware, and the features available in the installed release. For mixed-brand installations or unsupported camera variants, verify compatibility before relying on it as your primary management tool.
Frequently Asked Questions
Where can I download Illustra Camera Manager for Windows?
Use the official Illustra-hosted ZIP package. Extract the archive and follow the included installation instructions.
Is Illustra Camera Manager free?
The supplied package is available from an official Illustra-hosted download URL. The pricing or licensing terms were not independently confirmed for this specific release, so consult the official documentation or support portal if licensing is important to your deployment.
Can Illustra Camera Manager find cameras automatically?
The supplied walkthrough describes automatic scanning through a selected Wi-Fi or Ethernet connection, as well as manual searching. Discovery depends on network reachability, camera compatibility, and valid access credentials.
Can I change an Illustra camera’s IP address with this tool?
The application provides access to supported network settings. The precise controls depend on the camera model and release. Review the existing configuration and ensure the new IP address is valid and unique before applying changes.
What does Unauthorized mean in the camera list?
It indicates an authentication problem in the described workflow. Check the camera’s current username and password and update the credentials in the application where supported.
What does Conflict mean?
The supplied walkthrough uses this status for a duplicate-IP conflict. Check the affected devices’ IP addresses and MAC addresses, identify the duplicate assignment, and correct it carefully.
Can I update multiple cameras at once?
The supplied walkthrough describes a bulk firmware-upgrade workflow and bulk configuration templates. Confirm that every selected camera is compatible with the firmware or settings before proceeding.
Does Illustra Camera Manager support third-party cameras?
The supplied walkthrough describes third-party camera support as planned for future releases. Do not assume it is supported in your installed version; check the latest official compatibility information.
Is Illustra Camera Manager the same as Illustra Connect?
No. They are separate applications. Use the utility and documentation appropriate for your camera model and the application version you intend to run.
Final Verdict
Illustra Camera Manager provides a centralized workflow for discovering compatible Illustra cameras, reviewing device information, configuring supported settings, and managing firmware or selected configuration tasks. It can be particularly useful for installers working with several supported cameras on the same network.
Before installing it, download the package from the official Illustra source, verify compatibility with your exact camera models, and follow the included manual. For network changes and firmware upgrades, check each device carefully rather than assuming that a bulk operation is suitable for every camera in the installation.
Official resources
