
If you use AVYCON security cameras or a compatible Diversity Series DVR or NVR, you can monitor your surveillance system from a Windows computer using AVYCON’s desktop software. The company provides a mobile surveillance application called AVYCON Mobile One and a separate Windows desktop client called CMSONE.
If you are searching for AVY Mobile One for Windows, it is important to download the correct software. AVYCON’s official documentation recommends the CMSONE desktop client for viewing cameras and recorders remotely from a PC. The Mobile One app is intended for smartphones.
In this guide, you will learn how to download AVY Mobile One for PC, install the official CMSONE software, register your account, add an AVYCON recorder, view live camera feeds, and access recorded footage.
What Is AVY Mobile One for Windows?
AVYCON Mobile One is a mobile surveillance application designed to help users access compatible security cameras and recorders through a smartphone. It provides features such as live viewing, remote playback, video backup, and push notifications.
However, AVYCON does not list Mobile One as a native Windows desktop application. For computer users, the company provides CMSONE (Diversity Series), a dedicated Windows desktop client.
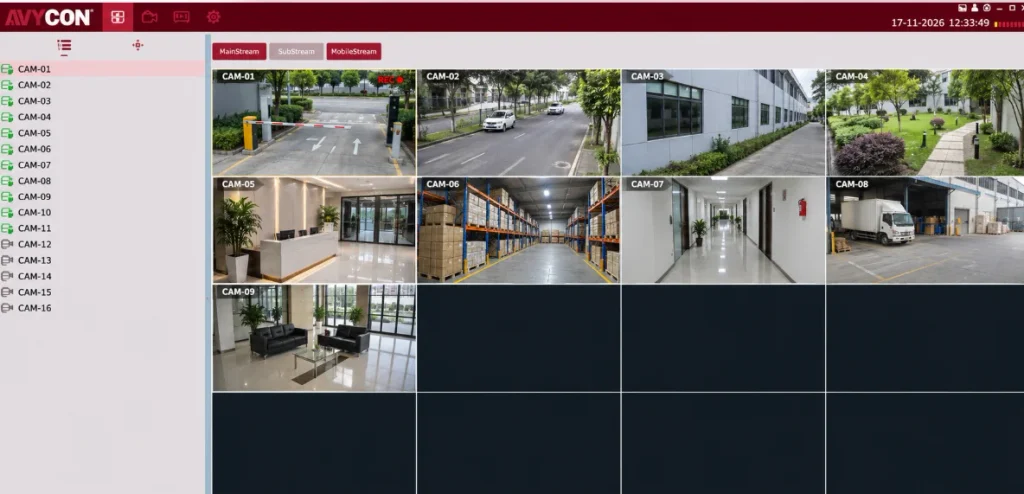
CMSONE allows users to connect compatible IP cameras and recording devices, organize camera channels, monitor live video, search recorded footage, and manage surveillance devices from a computer.
The two applications serve different purposes:
| Feature | AVYCON Mobile One | CMSONE |
|---|---|---|
| Platform | Mobile devices | Windows PC |
| Live camera viewing | Yes | Yes |
| Device management | Yes | Yes |
| Remote playback | Yes | Yes |
| Video backup | Yes | Yes |
| PC multi-camera monitoring | Not its primary platform | Yes |
| Push notifications | Supported mobile feature | Not established as a desktop feature |
Therefore, if you want to use AVY Mobile One for Windows, CMSONE is the official desktop alternative recommended by AVYCON.
AVY Mobile One Download for Windows
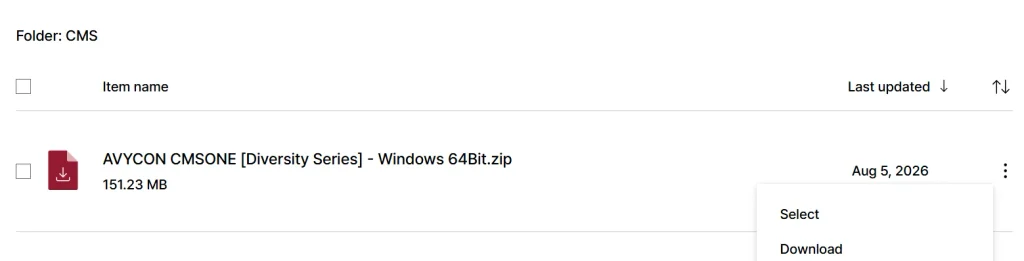
To monitor your AVYCON cameras from a Windows computer, download the official CMSONE software.
AVYCON provides a dedicated Windows 64-bit installation package for its Diversity Series desktop client.
Software Information
| Detail | Information |
|---|---|
| Software name | AVYCON CMSONE |
| Related mobile application | AVYCON Mobile One |
| Developer | AVYCON |
| Software category | CCTV CMS / Surveillance Client |
| Platform | Windows 64-bit download |
| Software series | Diversity Series |
| Download format | ZIP |
| Current version | Not independently verified |
| Installer size | Not verified |
| Official source | AVYCON |
Official Download Link
Download AVY Mobile One for PC (Windows desktop alternative):
Download AVYCON CMSONE for Windows 64-bit
You can also visit the official AVYCON FAQ, where the company provides its Windows and macOS CMSONE downloads.
Important: The Windows package is CMSONE, not the Mobile One Android application. Downloading the desktop client is the recommended route for monitoring compatible AVYCON recorders from Windows.
AVYCON CMSONE System Requirements
Before installing the software, check whether your computer meets the configuration documented in the CMSONE Pro User Manual.
The January 2023 manual lists the following operating configuration:
| Component | Documented configuration |
|---|---|
| Operating system | Windows 7, 8.1 and 10 |
| OS architecture | 32-bit and 64-bit listed in the manual |
| Processor | Intel Pentium 4, 3.0 GHz or above |
| RAM | 2 GB or more |
| Graphics card | Radeon X700 series |
| GPU memory | 256 MB or higher |
These are the specifications listed in the older manual, not independently tested minimum requirements for the current Windows 64-bit installer.
Windows 11 compatibility is not confirmed by that manual. If you are using Windows 11, check with AVYCON before deploying the client in a production surveillance environment.
A stable network connection is also important when accessing cameras and recorders remotely.
Difference Between AVYCON CMSONE and CVMS
AVYCON CMSONE and CVMS are two different CCTV management software solutions designed for managing compatible AVYCON surveillance devices. CMSONE is associated with AVYCON’s Diversity Series and is the desktop client used for connecting compatible recorders, viewing live camera feeds, and accessing recorded footage. CVMS, on the other hand, is a separate video management platform with its own Lite and Standard software editions, device management interface, and server/client architecture. Both solutions offer centralized CCTV monitoring, but they are not interchangeable. The correct software depends on your recorder model and product series. If you own a Diversity Series recorder, use CMSONE; for devices supported by the CVMS platform, use the corresponding CVMS software. Always check recorder compatibility before downloading either application.
How to Install AVY Mobile One on Windows
The Windows installation process uses CMSONE rather than the mobile APK.
Follow these steps to install the desktop software.
Step 1: Download the CMSONE ZIP File
First, open the official AVYCON Windows download link.
Download the CMSONE Diversity Series Windows 64-bit ZIP package to your computer.
After the download finishes, open your Downloads folder and locate the ZIP file.
Step 2: Extract the Downloaded File
The installer is supplied in a compressed ZIP package.
- Open your Downloads folder.
- Locate the downloaded CMSONE ZIP file.
- Right-click the archive.
- Select Extract All.
- Choose a destination folder.
- Open the extracted folder.
Locate the Windows installation executable provided inside the extracted package.
Step 3: Run the Installer
Double-click the installation executable to start the setup process.
If Windows displays a security confirmation, check that you are opening the installer downloaded from the official AVYCON website.
Follow the installation wizard and accept the required installation options.
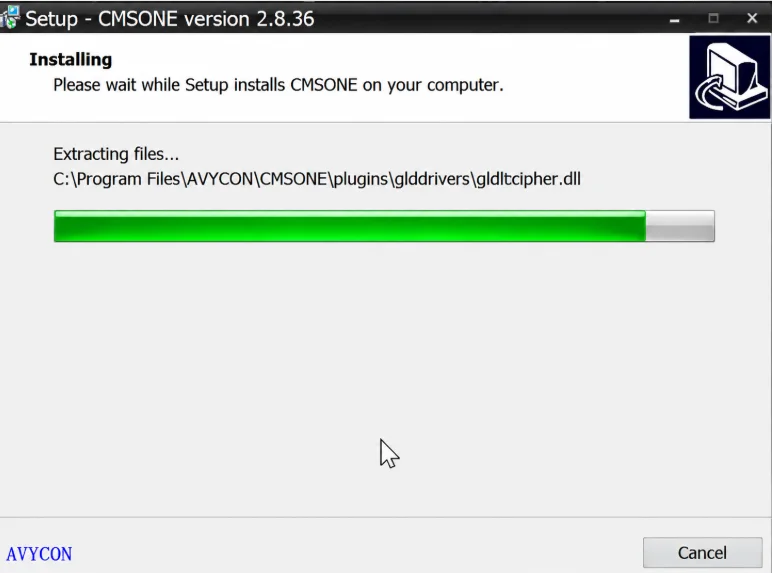
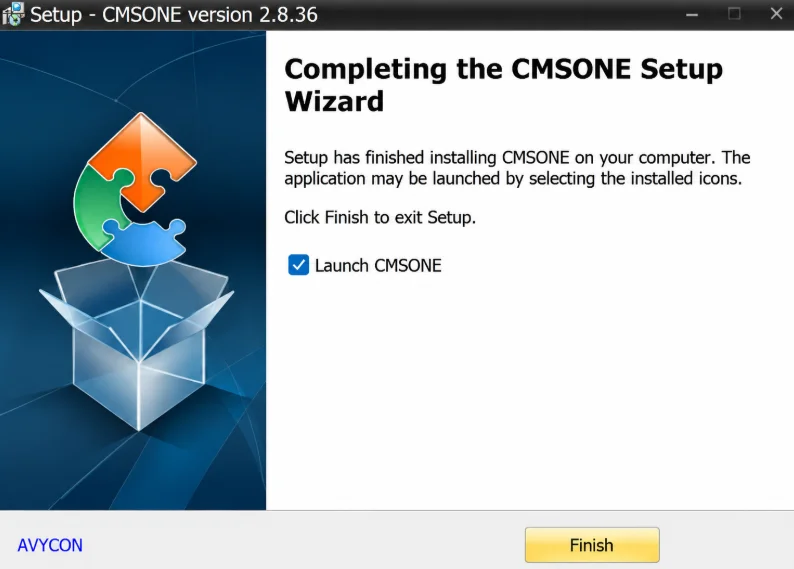
Step 4: Complete the Installation
Allow the installer to finish copying the required program files.
Once installation is complete, launch CMSONE using its desktop shortcut or Windows Start menu entry, if provided.
AVYCON also publishes an official tutorial titled CMSONE – How To Install & Add NVR/DVR For Windows. It demonstrates the installation and initial device connection process.
How to Register and Log In to CMSONE
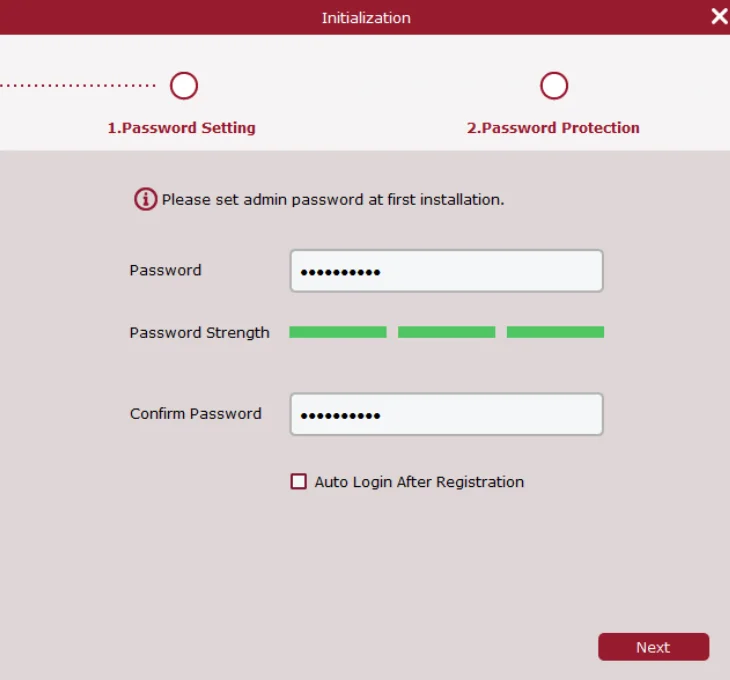
After opening CMSONE for the first time, you may need to register a Super User account before accessing the main interface.
The supplied CMSONE Pro User Manual documents separate sections for Super User registration, login, and password reset.
Follow the registration screen to create the account.
- Open CMSONE.
- Select the registration option if prompted.
- Enter the required account information.
- Create a secure password.
- Complete registration.
- Return to the login screen.
- Enter your account credentials.
Use the credentials created during registration. Do not assume that a universal default password works for every installation.
How to Add an AVYCON DVR or NVR to CMSONE
After logging in, you need to add your compatible recorder or IP camera to the software.
AVYCON’s official FAQ gives the following connection path:
Home → Device Management → Plus (+) → Enter recorder information → Add.
The CMSONE manual also documents automatic device discovery and manual device addition.
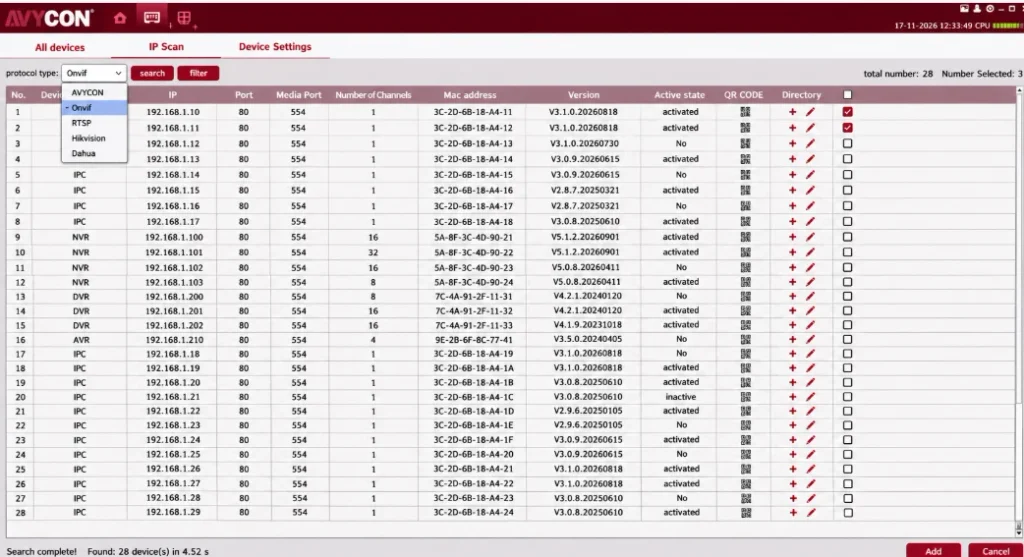
Method 1: Add a Device Automatically
Automatic Search is useful when the recorder or camera is accessible on the computer’s network.
Follow these instructions:
- Open the CMSONE main interface.
- Go to Device Management.
- Select Auto Search.
- Choose the appropriate protocol.
- Click Search.
- Review the discovered devices.
- Select the required recorder or camera.
- Enter its username and password.
- Click Add.
The manual documents device discovery using Private, Hikvision, Dahua, and ONVIF protocol options.
The available protocols and successful connection depend on device compatibility and configuration.
Method 2: Add a Recorder Manually
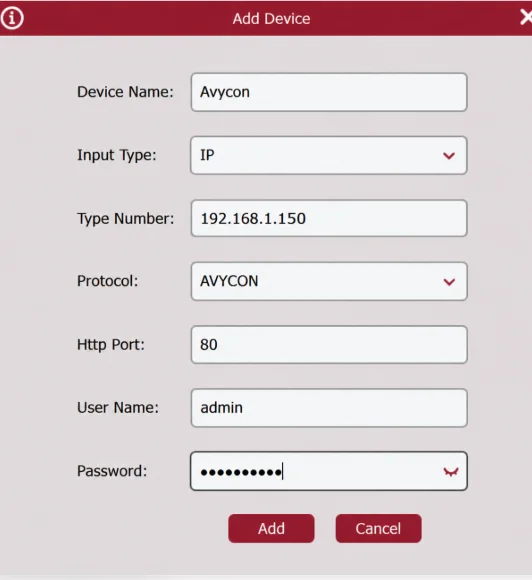
If automatic discovery does not find your device, you can add it manually.
Before starting, collect the recorder’s connection details:
- Device IP address or domain name.
- Device serial number if using P2PID.
- Media port, when required.
- Username.
- Password.
- Supported protocol.
Now follow these steps:
- Open Device Management.
- Click the Add Device option.
- Select the appropriate login type.
- Choose IP/domain name or P2PID.
- Enter the device IP address or serial number.
- Select the appropriate protocol.
- Enter the media port when required.
- Enter the device username and password.
- Click Add.
The CMSONE manual lists 37777 as the default media port for the documented IP/domain connection mode. The actual port can be different depending on the recorder configuration.
After adding the device, check its connection status in the device list.
How to View Live CCTV Cameras on Windows
Once the recorder has been added successfully, you can open the Preview section to view camera feeds.
CMSONE provides a monitoring interface where users can open individual cameras or multiple channels.
To start live viewing:
- Open the Main Menu.
- Select Mainview.
- Locate your recorder in the device list.
- Expand the recorder to display its channels.
- Double-click the camera you want to view.
You can also drag a camera channel into an available preview window.
The software supports multiple viewing windows and saved camera layouts.
According to the manual, CMSONE can display up to 128 channels simultaneously, depending on the connected devices and system configuration.
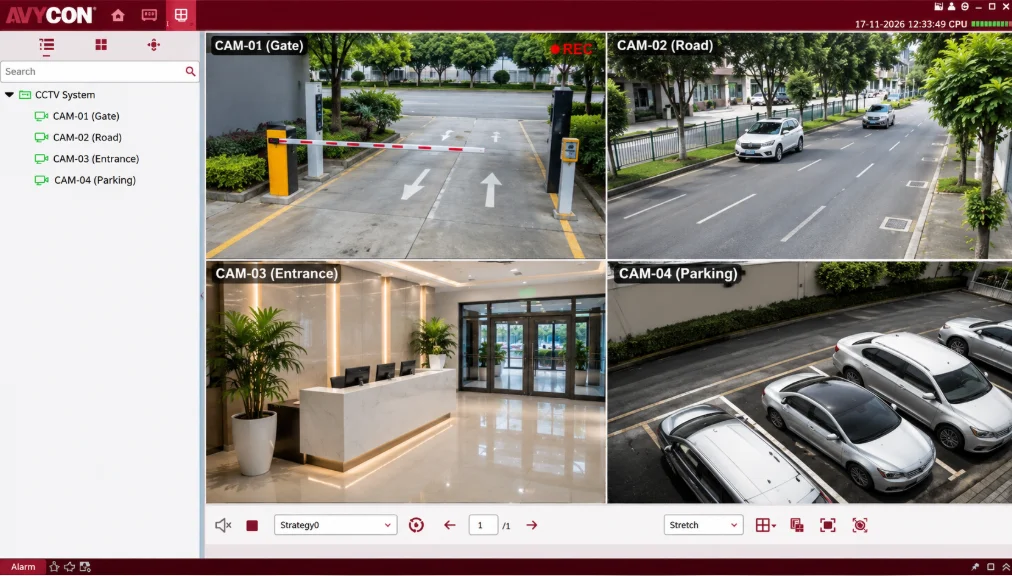
Multi-Camera Monitoring
If you have multiple cameras installed, you can organize them into different viewing layouts.
The software allows users to:
- Change the number of monitoring windows.
- Arrange camera channels.
- Create custom camera views.
- Save frequently used layouts.
- Switch between saved views.
This is useful for monitoring several areas of a property from one Windows computer.
How to Play Recorded CCTV Videos
CMSONE also provides a Remote Playback section for searching and viewing recordings stored on compatible surveillance devices.
Follow these steps:
- Open the main menu.
- Select Remote Playback.
- Choose the recorder from the device tree.
- Select the camera channel.
- Choose the required date and time.
- Configure the search options.
- Click Search.
- Select the recording from the results.
- Start playback.
The playback interface includes controls for playing, pausing, changing playback speed, capturing screenshots, and exporting video.
Available playback options depend on the recorder and stored footage.
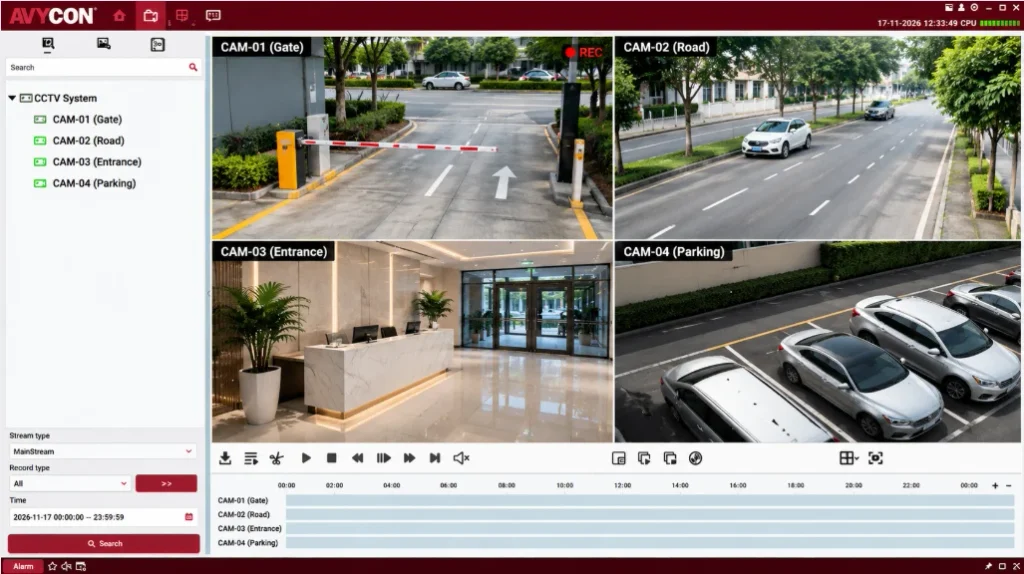
How to Export and Back Up Recorded Footage
If you need to save important CCTV footage, CMSONE provides video and image export options.
The supplied manual documents exporting recorded videos and images through its playback interface.
A typical workflow is:
- Open Remote Playback.
- Search for the required recording.
- Select the video or image you want to save.
- Use the available export option.
- Select the destination location.
- Complete the export process.
You can use the exported footage for reviewing incidents or keeping a separate copy of important recordings.
The available export formats and options depend on the software and connected device.
image
Suggested image: CMSONE recorded video export interface from the manual.
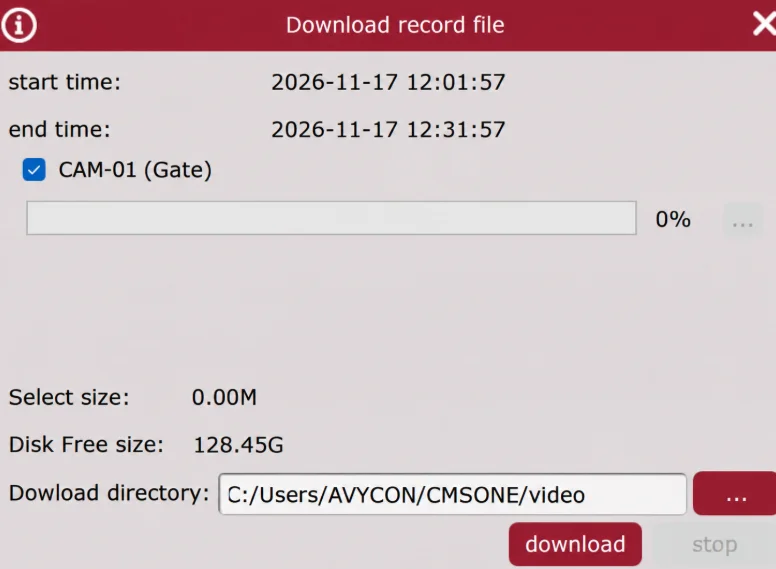
Other Useful Features of CMSONE
Apart from live monitoring and playback, CMSONE includes several additional management functions.
Device Management
Add, modify, search, and remove compatible surveillance devices from the device management interface.
Dwell Plan
Create a monitoring sequence that automatically switches between configured camera views.
Search Logs
Review available client and remote device logs.
Account Management
Manage user accounts and their available permissions.
Remote Device Configuration
Access supported device configuration options, including camera channels, recording, network settings, alarms, and storage.
These functions make CMSONE useful for managing a compatible AVYCON surveillance installation from a centralized desktop interface.
AVY Mobile One for Windows Troubleshooting
If you experience problems while using the desktop client, check the following solutions.
1. CMSONE Cannot Find My Recorder
If the recorder does not appear during automatic discovery:
- Check that the recorder is powered on.
- Confirm that the computer and recorder are connected to a reachable network.
- Check the recorder’s IP address.
- Verify the selected search protocol.
- Try adding the recorder manually.
AVYCON’s manual also documents searching devices by network segment.
2. Recorder Shows Offline
If the recorder appears in CMSONE but shows an offline status, verify its connection information.
Check the IP address, media port, username, and password.
Also confirm that the recorder can be accessed over the network.
3. Cannot Log In to CMSONE
If you cannot access the software, verify the Super User credentials created during registration.
If you have forgotten the password, refer to the password reset section of the CMSONE manual.
4. Live Video Is Not Showing
If the camera appears in the device list but no video is displayed:
- Check the camera’s online status.
- Verify the recorder connection.
- Confirm that the selected channel is active.
- Check the device login credentials.
- Verify that your user account has the necessary permissions.
5. Remote Playback Is Not Working
Check whether recordings are available on the selected recorder.
Choose the correct camera channel and date range before searching again.
If no recordings are found, check the recorder’s recording configuration and storage status.
6. Windows Firewall Blocks the Connection
If the software cannot communicate with your recorder, review the Windows Firewall settings.
Only allow the necessary application or network communication after verifying the software’s source and the required connection settings. Avoid exposing recorder ports directly to the public internet.
AVY Mobile One for PC – Frequently Asked Questions
Is AVY Mobile One available for Windows?
AVYCON Mobile One is its mobile surveillance app. For Windows computers, AVYCON officially recommends CMSONE, its desktop client for the Diversity Series.
How can I download AVY Mobile One for PC?
Visit the official AVYCON website and download the CMSONE Windows 64-bit package. It is the desktop alternative for accessing compatible AVYCON cameras and recorders.
Is AVY Mobile One for Windows free?
The official download page provides the CMSONE Windows package, but the current licensing terms should be confirmed with AVYCON. Do not assume that every feature or connected device is covered by the same license.
Can I use AVY Mobile One on Windows 11?
The supplied CMSONE manual lists Windows 7, 8.1, and 10. It does not establish Windows 11 compatibility. Contact AVYCON to confirm support for your Windows version.
Can I add multiple AVYCON cameras to CMSONE?
Yes. The manual documents adding multiple IP cameras and recorders through automatic discovery or manual device configuration.
Does CMSONE support remote playback?
Yes. The software includes a Remote Playback section for searching, playing, and exporting available recordings from compatible devices.
Can I view several CCTV cameras at once?
Yes. The manual documents up to 128 simultaneously displayed channels, depending on the hardware and software configuration.
What is the difference between AVY Mobile One and CMSONE?
AVY Mobile One is designed for smartphone monitoring, while CMSONE is AVYCON’s desktop client for Windows and macOS. Both provide access to compatible surveillance devices, but their interfaces and available functions differ.
Final Words
AVY Mobile One is a convenient mobile application for accessing compatible AVYCON surveillance systems. However, if you want to monitor your cameras from a Windows computer, the correct official desktop solution is CMSONE.
With CMSONE, you can add compatible recorders, organize camera channels, view live footage, access remote playback, and manage supported surveillance functions.
Download the official AVYCON CMSONE Windows 64-bit package and follow the installation and device configuration instructions above to get started.
For compatibility information, software updates, and additional instructions, always refer to the official AVYCON support website.
