XVRView For PC is a CMS Wizard application that connects multiple remote devices and makes monitoring easy. In this article, we are going to provide you with a detailed analysis of this application for Windows OS, Mac OS, and Android OS. We have also given here an illustrative installation of this app.
With its help, you can see multiple cameras by sitting at your choicest location. It makes the surveillance easier. It helps you remotely access the device. The benefit of this application is that it can playback videos, preserve them, and snap images for security purposes.
Life becomes easier and you feel protected. There is no threat under the surveillance of the XVRView app.
What Is A Content Management System?
A CMS is software that enables you to keep, edit, and modify data for a particular purpose. Here in our case, it keeps the data of various devices and CCTV cameras for security purposes. It shows us locations that are in far-flung areas. It receives data, processes it, and transforms it into video forms.
How Is CMS Helpful For Monitoring?
The application gives us the option to view various cameras at a time. These cameras are installed at various locations. They can not be simultaneously accessed without the support of this software. Let’s take an example. We have 6 locations where security surveillance systems are installed.
Each device is connected to 10 cameras. There is a total of 60 cameras that you want to monitor. These locations are at a good distance away from one another.
You being the owner want to see these devices from your office which is at the seventh location. This CMS application gives you the option to watch these cameras from one location. It can give you a real-time view of 512 cameras at a time on a single screen. It supports Mac OS, Windows OS, and Android OS.
What Is an XVRView For PC Application?

It is designed and manufactured by XVR Company which is based in China. It has a range of security surveillance products, that give us security and safety. This software is an intelligent one, that can sense activities, play recordings, give us push messages, and alert us realizing any threat. It can connect multiple NVRs, DVRs, IP cameras, etc., and give us a secure vision.
It has a long track record of successful monitoring. We will give you in this article a detailed demonstration by giving the step-by-step guide for Windows OS. You have to refer to that section of the article.
Features & Functions Of the XVR Application

The features are the sole purpose of the device. This app has magnificent qualities. The attributes are the gems of any gadget. When we know their qualities and functions, we use them to their full capacity. The following are their main features.
- The app is specially designed to give us cloud monitoring
- It is appropriate for easy cloud management. It supports LAN search devices and manual search
- You do have not to change anything. LAN and WAN can be viewed at any time
- It gives us a real-time view. There is no time lag. Every device that runs a live view also runs a real-time video
- It is a smart app. It supports sensors. It can easily sense the audio and motion detection
- You can pre-define sensitive regions in this app. It will alert you and alarm you when anyone intrudes in those zones
- The app supports recording. You can watch playback, take images, preserve recordings, and access it from any place
- The application approves the two-way audio. You can transfer any message to the person on the device end. You can also horrify the interlopers on the camera end by shouting at them and raising an alarm
Download Free XVR Application For Windows OS
You will get the complete file for this software for Windows OS. It is given to you here in the form of a download button. You have to click the button to load the file. It is available here free for you. The file is given in a squeezed format. You have to un-squeeze the file to make it run on your PC.
It is specially designed for Windows OS. We have also given a detailed illustration of the installation process below. You can refer back to that column for a better understanding. Click the link below to install the app for Windows.
Download Free XVR Software For Mac OS
To load this application for Mac OS, you will receive a link. The link is in a compressed form. You have to extricate it before getting it for Mac. It empowers you with remote access and full-time monitoring. The example of loading it and installing it for Mac OS is similar to what it is for Windows OS.
An illustrative loading and installing process is given for Windows OS. It will hint you to do it for a Mac gadget.
Download Free XVR App For Android OS
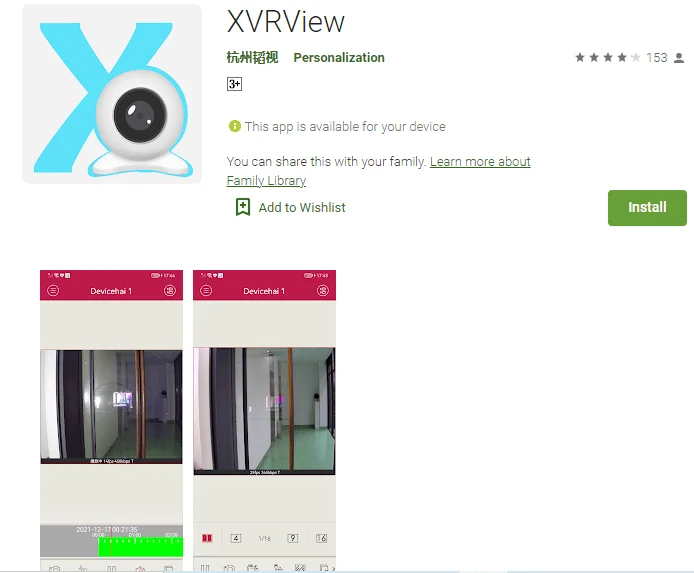
To get it for your Android-based mobile phone, you have to push the link button. It will navigate you to the Google Play Store page link of this application. You have to press the installation button to get it.
Once it is installed, you have to log in to the app by creating an ID and password. After that, scan the QR code and add the device for this app. Click the link to get it.
How To Install XVR View Application For Windows OS?
When you go to install it for a Windows PC, the first thing is that you have to load the file. The file is given in a download button form. Click the button to get the content. It is given in a compressed file format. You have to decompress it for installation. You have to do the installation in three steps.
Step-1 Install The CMS Application
The application is given in the Chinese language. The process is the same as it is for any other app. You will easily sense the language.
After loading it, we go for the installation. The moment we click the app, the following page opens.
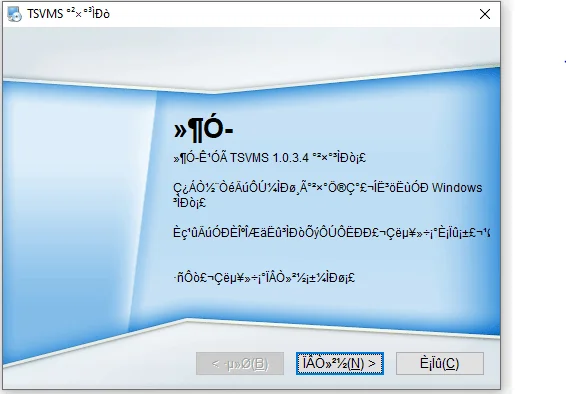
Here, the app will ask permission from you. If you are fully satisfied with installing the app then press the next button.
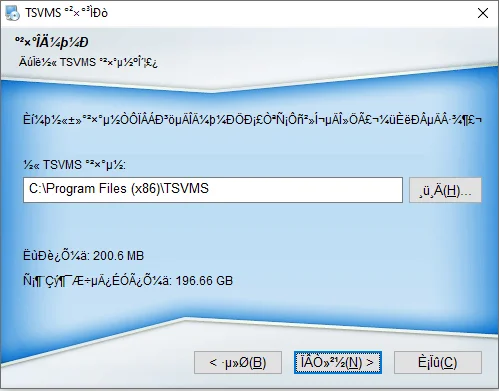
Here, it is asking you for the path of the device. The path you want to give to upload the content. Mainly these kinds of files are preserved in a C drive. Click the Next button.
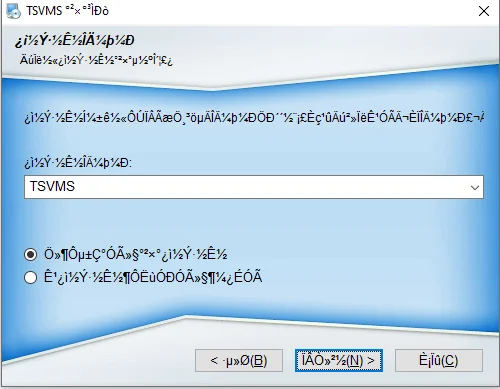
It is notifying you for agreeing to load the files and beginning the installation. Press the Installation button.
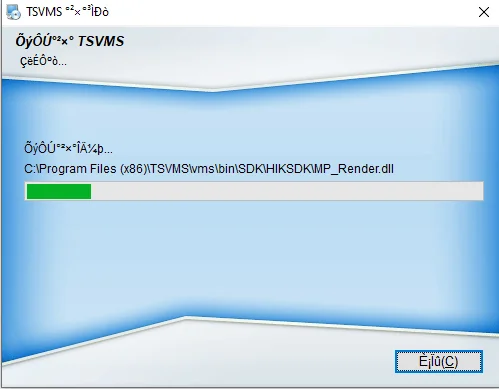
The installation process begins. You are getting the content at the specified location. This way the entire content loads on the specific folder and the installation system informs you with a “Finish” message.
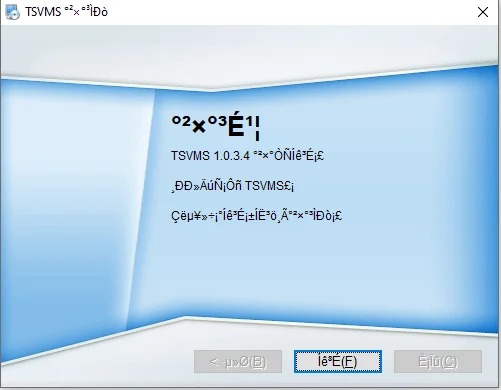
Press the “Finish” button. The installation is over. Now the next step begins.
Step-2 Logging In The Application
This step will demonstrate to us how to log in to the CMS.
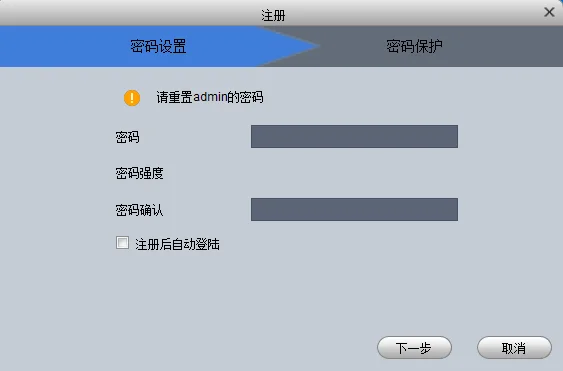
Here you see two columns. These are for password creation. You can choose any password, but that must be safe. A safe password has a combination of uppercase, lowercase, characters, and numerals.
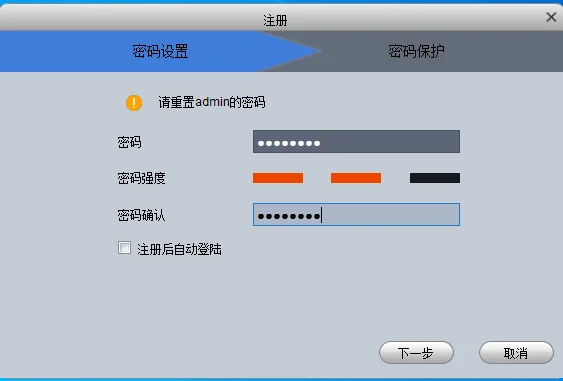
As it is shown here, you make a password, and after putting it in there press the Log in button.
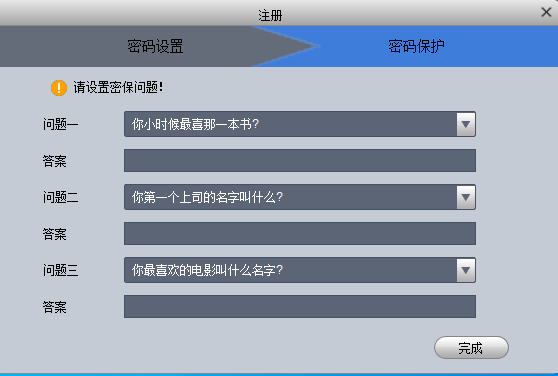
They will ask you some basic questions for remembrance purposes. These questions are- Name your first school, Name your favorite color, and Name your first book. Answer these and press the next button.
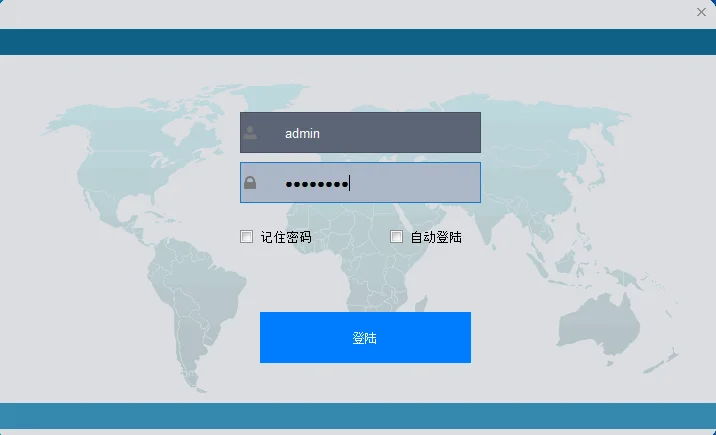
By default, the User Id. is “admin” and the password is the one that you have created. Press the login button and the Home screen of the software will show up.
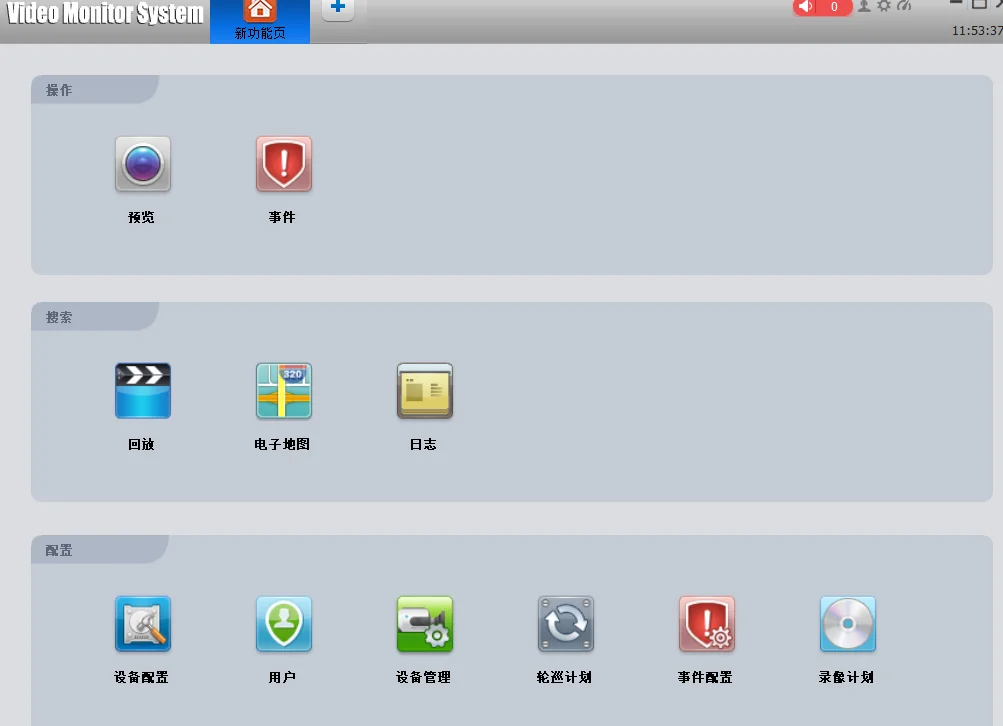
Step-3 Add The Device And Monitor The Camera
For that, you have to open the page where the option is given for device adding.
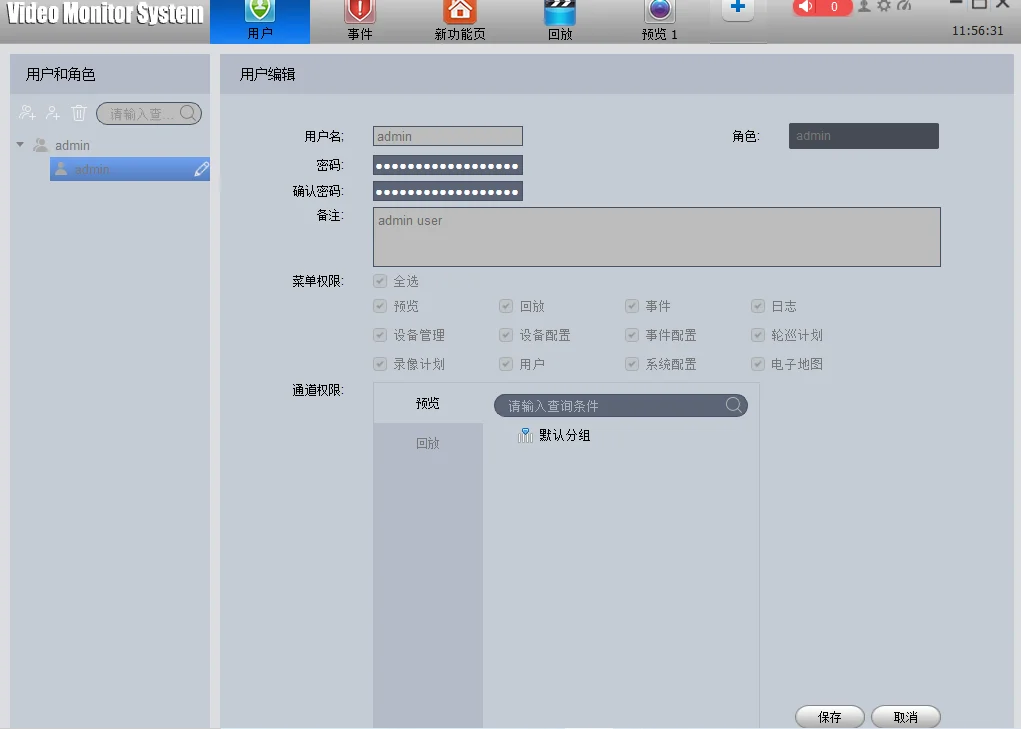
Fill in the Device name, IP address, User Id., and password to get them connected with the gadget.
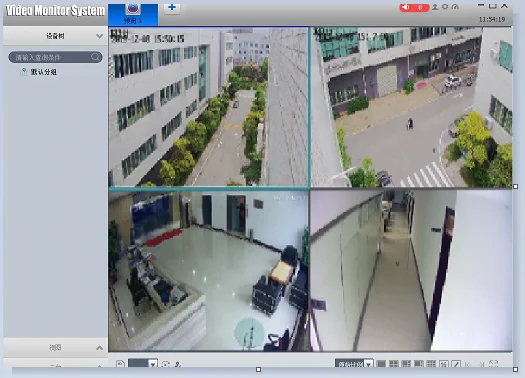
The cameras are added and the monitoring begins.
Conclusion
The Application has been analyzed and discussed at length here. We have also given the step-by-step process to upload and install it. There are many prominent features of the app.
They are also mentioned in this article. Users can get all the links in this post. It is given for Windows OS, Mac OS, and Android OS. You will get it free of cost. Download them and monitor your devices.
I hope you will appreciate the post. It is given to the user client. Please share your responses.
Thank you.

Hi I need an XVRView for windows in English, thank you!
Right now we do not have any, if I found, I will definitely give you.
se como cambiarle el idioma al programa, en ingles y español
Chinese is a bit hard, but fortunately it is my second language. To change the displayed language, click the “settings” icon at the top right of the screen after successful login.
1. In the left column of the new popup screen, click on fourth line showing “系统与语言”
2. Look carefully down the displayed list of options, click on the box immediately to the right of the characters “语言:”. A list of available languages will appear. Select the one you want, then click the centre button marked “保存” meaning “Save”.
3. A confirmation window will appear, click the left hand button and the programme will restart in your chosen language.
thank you.
HI
i bought maisi cctv on amazon i tried all i couldn’t get with maisi application Tseye or XVR view
and I tried to scan the code it does not work
on my laptop and my phone I download application but I net no image
and does anyone have a solution where i can follow
Thank you
To troubleshoot the issues with the Maisi CCTV system and Tseye or XVR View applications:
1. Check network connectivity on your laptop and phone.
2 Verify compatibility between the Maisi CCTV system and the applications.
3. Double-check the setup and configuration of the Maisi CCTV system.
4. Update the applications and firmware to the latest versions.
5. Reset and reconfigure the system if necessary.
6. Contact Maisi’s customer support for further assistance.
i need to download it on my laptop
Download link is given you can download it.
hey,thanks for the app but how to activate cloud coz i have tried and it only workin on LAN
To activate cloud storage, you need to locate the CloudID in the network options and use that ID instead of the LAN IP address.
Need XVR View for PC. The below download link is not working and giving 404
https://drive.google.com/u/0/uc?id=1SIjEOjzvwh2Hbebn0Q-Ad6XV3Z3DV6YH&export=download
I have android app of XVR View and used bar code to scan and add device. Please also guide how to install on PC
I apologize for the inconvenience you’re experiencing with the XVR View for PC . It seems that the download link is currently not working, showing a 404 error. Unfortunately There is a technical problem on the website due to which some software download links are not working. We are working on it, and once it is fixed, we will inform you.
Hello team,
I am using XVR and XVR View Mobile application to view remotely from mobile device. I was using local broadband and have connected XVR from router using LAN cable. This setup was working fine but internet connectivity used to frequently give issue by local broadband provider
I purchase Jio Fiber for Internet broadband connection and then used Lan cable from its router to XVR. Although light blinks both at router end and XVR end for LAN connectivity, but when i am using XVR View application from mobile camera is showing as offline. The same lan cable from Jio fiber router ti laptop is working fine as well as wifi also but not works when connected with XVR.
I tried to look for similar issue over internet and found below solution
https://youtu.be/EZTp66jerzo
I tried to disable client access control from Jio Fiber Router’s admin console and save changes, performed multiple round of restart of router and complete XVR setup but still faced camera offline issue.
Neither the vendor who installed CCTV setup or the Jio technician is able to help me. Kindly help me if you have solution or anyone who faced this issue earlier can guide on same or any workaround to fix this as the Jio Team already took 6 month payment im advance from me and I am not able to use it for the CCTV setup for which i took the connection.
I understand the frustration you’re experiencing with your CCTV setup. It seems like you’ve already tried several troubleshooting steps, and it’s unfortunate that the issue still persists. Since you’ve tried disabling client access control on the Jio Fiber Router and restarted both the router and the XVR, let’s explore a few more possibilities to help you resolve the camera offline issue:
1. IP Address and Subnet Settings: Make sure that the LAN settings on your XVR are properly configured to match the settings of the Jio Fiber Router. Ensure that the IP address assigned to the XVR is in the same subnet as the router and that there are no IP conflicts.
2. Port Forwarding: Check if your CCTV system requires specific ports to be forwarded for remote access. If so, configure port forwarding on the Jio Fiber Router to direct incoming connections to the correct IP address of the XVR.
3.Firewall Settings: Verify if there are any firewall settings on the Jio Fiber Router that might be blocking the communication between the XVR and the mobile application. Temporarily disable any firewall settings (if safe to do so) to test if this resolves the issue.
4.Dynamic vs. Static IP Address: While many devices can work with dynamic IP addresses, sometimes assigning a static IP to the XVR might provide more stability, especially for remote access scenarios.
5.Network Isolation: Some routers have features that isolate devices on the same network, preventing them from communicating with each other. Make sure that such features are turned off on the Jio Fiber Router.
6.Firmware Updates: Ensure that both the Jio Fiber Router and the XVR have the latest firmware updates installed. Sometimes, firmware updates can resolve compatibility issues.
7.Tech Support Channels: If you’ve exhausted all options and are still facing issues, it might be a good idea to revisit your vendor and Jio’s technical support. Explain the situation thoroughly, share the troubleshooting steps you’ve taken, and request their assistance to resolve the problem.